Wednesday, December 15, 2021

Simple and Masculine Graduation Money-Card

Hello Crafty Friends!

I just got back from out of town having celebrated one of my brother's awesome accomplishment... graduating from UTEP (University of Texas at El Paso) with his bachelor's degree in Software Engineering! 

Since I couldn't find a fitting gift for him, I decided to give him the choice of getting his own gift by giving him some money. 

This is simple, quick and masculine money holder was received well by my brother. FYI... I gave him a lot more than the $10 you see. For the sake of a picture, I slipped in a $10 real quick.


 I love how simple this money holder came together with just a few products.

CARDMAKING TIPS

  • Cut a 7-1/2″ x 7″ piece of Basic White Thick cardstock for your base, then scored at 2-1/4″ and 5-1/4″ along the length.  
  • You'll need two pieces of In Good Taste DSP that measure 2-1/4" x 7" to adhere onto the card base.
  •  The belly band is cut from Brushed Metallic Cardstock at 1-1/2" x 6-1/2".  
  • The stamp is an old retired set from 2014 that I really like to use and is called Pomp and Circumstance.
  • The word "congratulations" is stamped-off throughout the pieces of DSP using Early Espresso ink. The stamping off helps so that the word is more subtle.
  • For the front label, cut a piece of Basic White cardstock using the middle-sized die from the Hippo & Friends dies.
  • Stamp the sentiment onto a piece of Brushed Metallic Cardstock using Staz-On ink. Cut it out with the smallest die from the Hippo & Friends label die. Attach this piece onto the white label using dimensionals. This will adhere onto the belly band as shown below.

  • For the graduation hat, stamp the image onto some Basic Black cardstock using versamark ink. Then heat emboss with white embossing powder. Add a little Wink of Stella for some shimmer, if you'd like.
  • For the inside, 
    • Use some Tear & Tape Adhesive to adhere the left and right edges of the bottom panel of the card base, to create the money pocket.
    • Cut a strip of Brushed Metallic Cardstock at 1/4" x 7" to adhere it about 1/8" below the top edge of the bottom panel.
All you have left is to write your personal message on the top panel of the inside and VOILA!!!

CARDMAKING SUPPLIES
Click on the links below to view any of the supplies used for this project.


BLOG GIVEAWAY!

The In Good Taste DSP is such a great pack of variety of paper that I want to give 1 away! 
If you comment below by telling me what occasion you would use the money-holder template for, you will be entered to win!
Winner will be announced on Friday, December 17th at 12pm (CST). 

Thanks so much for stopping by!!!


Tuesday, November 16, 2021

Birthday Special

Hello Crafty Friends!!! 

I just want to jump on here real quick and say that it's my Birthday tomorrow and I want to share the excitement of the celebration with you by giving you two FREE options with your order of $35 or more

  1. FREE Shipping - you must email me your order
  2. FREE Embellishment ($10 value) - Shop Online at the link below or e-mail me your order.

This personal promotion will last until Friday, November 19th.

Place you order online at the following link: Shop Now

That's all I have for you today! Have a wonderful Day!

Thursday, November 11, 2021

#TGIFC341 - Intricate Leaves Birthday Card

 Hello Crafty Friends! 

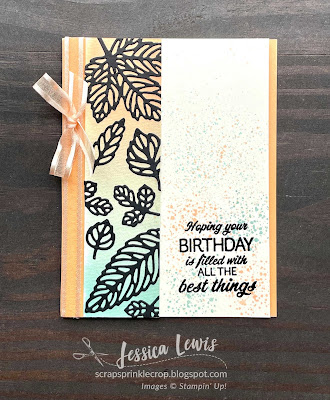
Welcome to this week's TGIF Challenge #341 entry! This week's challenge is a beautiful color combination of Pale Papaya, Pool Party and Very Vanilla. 


I hadn't used a color combination like this one before and couldn't wait to get started! I will be killing two birds with one stone here since I needed to create a card for my mother-in-law, to whom I owe a Birthday card! Eeeek...

My card features the Intricate Leaves dies that I cut out from Basic Black cardstock. The Pale Papaya color was also the star of the show here as I used the ribbon, the shimmery vellum and the inks on the card.


Cardmaking Supplies:

For this card,  you will need the following list of products besides scissors and adhesive: https://s.tamp.in/b6Yz17

Cardmaking Tips:

  • The Very Vanilla Card base measures 4.25" x 5.5"
  • The watercolor strip measures 1.5" x 5.5"
  • Cut two strips of Pale Papaya Shimmery Vellum that measure .5" x 5.5".
  • Use Adhesive sheets to adhere to the back of a piece of Basic Black Cardstock before you cut out the leaves.
  • Cut an 1/8" off of the right edge of the card front to expose the shimmery vellum on the inside of the card.


Once you've gathered your list of products, join me in this video tutorial to create this card! 


Thank you so much for joining me!
If you chose to create this card along with me, I would love to know about it! So please comment below!!!

That is all for this week. Until next time ... 


Wednesday, November 3, 2021

#TGIFC340 - Card mashup with Pretty Pumpkins & Detailed Leaves

 Happy Wednesday Crafty Friends!!!

Welcome to another blog post featuring this week's TGIF Challenge #340 that introduces a Challenge Mash-up. 

I was able to choose 2 or more challenges from the month and ended up choosing the highlighted options:

  • Color Challenge - Basic Black, Vanilla, Blackberry Bliss
  • Sketch Challenge
  • Halloween
  • Alcohol Blending Technique

Below is my creation that features the Intricate Leaves Dies and the Pretty Pumpkins Stamp Set. I added a few touches of Gold to tie into that beautiful Blackberry Beauty Specialty DSP, which is unfortunately not available at this time.


Cardmaking Tips
  • Cut a 3" x 4" piece of vellum. Use the Blackberry Bliss, Rich Razzleberry and Polished Pink Dark Stampin' Blend markers to use the Alcohol Blending Technique. Set aside to dry.
  • Use an A4 cardstock base from Very Vanilla Thick Cardstock. 
  • Use the largest Stitched So Sweetly scalloped die to cut out from the Blackberry Beauty DSP and adhere towards bottom right side of card base. 
  • Cut out the large leaf and the two small leaves from the Gold foil sheet and adhere on top of the DSP as shown.
  • Use the 2nd largest Stitched So Sweetly scalloped die to cut out from Very Vanilla Cardstock. Adhere on top of the DSP using dimensionals. 
  • Bring back the dry piece of vellum and trim it to 2 1/8" x 3 1/4". Use some versamark ink to stamp the detailed pumpkin image onto the center of the vellum. Heat emboss with white embossing powder and adhere with tape adhesive onto the center of the vanilla rectangle.
  • Stamp the sentiment "Gather Together" onto a piece of Basic Black cardstock using versamark ink. Heat emboss with gold embossing powder. Use your sharp scissors to cut around the sentiment. Adhere on top of embossed vellum using glue dots.
  • Put the final touch onto the detailed pumpkin using the Gold shimmer ribbon that is cut in half, lengthwise and tied into a bow. Adhere with a glue dot.
  • Follow a similar layout from the card front for the inside of the card. This time I left out a sentiment.


Cardmaking Supplies:
To view and shop from a complete list of supplies used for this card, click on the following link: https://s.tamp.in/4YZs73 

I do hope you have enjoyed this week's card project! I would love to hear from you in the comments below!

Until next time... 

Tuesday, November 2, 2021

Enter Eden's Garden

 Happy, Happy Tuesday Crafty friends!!

I'm WAAAAY overdue on a blog-post so I will get started again as we enter the month of November (my birthday month.. wahoo!).

A new early-release is out and ready for you! Enter and explore Eden with the Eden’s Garden Collection! 

This delightful and desirable collection includes early-release products from the January–June 2022 Mini Catalog—a bundle of stamps and dies that’s blooming with beauty and bounty. Plus, exclusive products you can’t uncover anywhere else—a pack of paper patterned with green and gold, a set of specialty sheets for gift-giving and textured touches, and a sparkling set of gleaming gems!

The Eden's Garden Collection is available until January 3, 2022.


Start with Savings Promotion

As you begin to "oooh" and "ahhh" over these products and consider buying the entire collection, know this: You can add the Eden's Garden Collection to your starter kit as part of the Start with Savings Promotion!

Instead of the standard $99 USD | $135 CAD Starter Kit—which is already a steal of a deal—aspiring demonstrators can snatch up a completely custom Starter Kit for only $75 USD | $100 CAD. What an absolutely unbeatable bargain for a box with a value of $125 USD | $165 CAD! 

If you can answer “yes” to any of the following questions, this promotion will provide you with an excellent opportunity to build your business or support your hobby! 
  • Do you regularly restock your craft collection and always want the latest and greatest Stampin’ Up! supplies? 
  • Would you enjoy the pile of perks that come with being a demonstrator? (perks are described under the Join My Team tab)
  • Were you a former team member who may be interested in coming back to our incredible community of crafters?

This wonderful starter kit promotion only lasts through the month of November, so don't wait! Contact me if you have any questions or want to join my team!


That's all I have for today!

until next time ...


Monday, September 20, 2021

Wedding Anniversary Card Using 'Nuts about Squirrels'

 Happy Monday crafty friends!

I am officially celebrating 13 years of marriage to my handsome husband and there's nothing like saying Happy Anniversary than with a handmade card!

I've been behind on using my stamp sets that I've purchased and believe it or not, I hadn't gotten to play with the Nuts about Squirrels stamp set! You can find this adorable stamp set at my Online Store or on page 49 of the Stampin' UP! 2021 Holiday Catalog.


 During the making of this card, I really wished there was a punch or dies for this set. The most tedious part about this was having to cut out all those leaves and nuts. However, I was able to manage.


Cardmaking Tips:

  • prepare the Thick Very Vanilla card base background by adding some So Saffron ink with a blending brush, making sure to have the darkest shade at the top.
  • for the Sun in the background, you can choose to create a 2 1/2" circle mask while you're blending the ink OR you can simply add a 2 1/2" circle from Very Vanilla cardstock. 
  • Use the Cork Specialty Paper to create the tree trunk and the tree branch. 
  • Use the oval shape of the Hat Builder Dies to trace the outside of the die onto the middle of the tree trunk. Cut out with scissors. Note: I didn't use the die itself to cut out the shape because I wanted the hole slightly larger.  
  • the tree trunk was popped up with dimensionals while the tree branch was adhered directly onto the card front.
  • Stamp about 6 acorns using Crumb Cake and Soft Suede ink then cut them out to fill the hole of the tree trunk.
  • Use Early Espresso ink to stamp the tree branch two times as shown.
  • For the masculine squirrel, stamp the 2 images onto a piece of Very Vanilla cardstock using Soft Suede for the outline and Crumb Cake for the shading. Cut out with scissors.
  • For the feminine squirrel, use the reverse stamping technique to stamp it onto a piece of Very Vanilla cardstock. The Stamparatus and the silicone craft sheet are extremely helpful with this! Add some eyelashes with your Early Espresso Stampin' Write Marker.
  • Stamp about 20 leaves onto Very Vanilla cardstock using Rich Razzleberry, Cherry Cobbler, Crushed Curry and Cajun Craze inks. I stamped the image in full strength ink then stamped again without reinking to get the different shades of leaves. Cut them ALL out with your scissors...while you're listening to music or watching TV.
  • The heart was cut out from Cherry Cobbler cardstock.
Inside Card
  • The background for the inside of the card was the same as the front except for the sun image. This time I created a smaller mask (1 1/2" circle) to place onto the cardstock while I added the ink with the blending brush. 
  • a 1" strip of the Cork Specialty Paper was adhered directly onto the cardstock using tape adhesive.
  • The tree branch was stamped using Early Espresso ink.
  • the two leaves were stamped onto a piece of Very Vanilla cardstock using Cherry Cobbler ink. One leaf was stamped in full strength ink and the other was stamped off, without reinking. 
  • Add the sentiment using Early Espresso ink and adhere 2 more acorns underneath.

Cardmaking Supplies:

The following link provides the full list of products used to make this card, except for cutting tools and adhesives: https://s.tamp.in/x1l9Wv 


I do hope you've enjoyed today's post! Don't hesitate to leave me a comment below. I'd LOVE to hear from you!

Until next time... 


Thursday, September 16, 2021

#TGIFC333 Sketch Challenge Meets 'Hippo Happiness'

 Hello Crafty Friends! 

I'm so glad to be back and feeling more like myself after getting sick for a while without any energy to craft! Yeah, I got the 'Rona'...

Anywho, moving onto this week's TGIF Challenge #333.


As I got to thinking about what my layout should be like, I immediately thought of strips of clouds so I went off of this idea and also wanted to use the alcohol technique for my cloud background, since I hadn't tried it. The alcohol technique is where you spread some color onto a piece of vellum with whatever color you'd like of a Stampin' Blend marker then bleed the colors using at least 91% alcohol.

I feel like the design of the card came together pretty close to what I was imagining in my head so I went with it. In comparison to the sketch challenge, I rotated the card to portrait mode and ended up fitting only two strips instead of three.

This unicorn rainbow card has quite a few elements in it so allow me to share some.. 

Cardmaking Tips:

  • The card base is from Balmy Blue cardstock, cut to 11" x 4 1/4" and scored at 5 1/2". The card opens from bottom to top.
  • Use a 4 1/4" x 5 1/2" piece of vellum and your Dark Balmy Blue Stampin' Blend marker to add some color throughout this piece, focusing on the top and bottom edges. Using a waterpainter filled with 91% alcohol, dab the vellum to achieve the desired look. Let dry.
  • Adhere the top and bottom edges of the vellum onto the Balmy Blue card base using some Tombow glue and a sponge, making sure to spread evenly. 
  • The rainbow piece was also created using vellum. Use a pencil to sketch the outline of the rainbow (mine measures 4" wide on bottom and is 2 1/2" tall). Use the following Dark Stampin Blend colors from top to bottom of the rainbow: Poppy Parade, Mango Melody, Daffodil Delight, Granny Apple Green, Bermuda Bay and HIghland HeatherUsing a waterpainter filled with 91% alcohol, trace the rainbow lines to help blend the colors together. Let dry then cut out with your scissors.
  • The clouds were cut from 2 1/2" x 4 1/4" strips of Basic White cardstock using the cloud shape from the Basic Borders dies. Pop them up from the vellum background using plenty of dimensionals.
  • Use the same colors you used in the rainbow to stamp the starburst image repeatedly onto the clouds as shown. 
  • The unicorn image was stamped onto a piece of Basic White cardstock using Daffodil Delight and Granny Apple green ink. 
  • The unicorn was placed onto a separate cloud that was cut out from Basic White cardstock using the Give It A Whirl dies.
  • Give the card front some finishing touches with adding some Wink of Stella glimmer to the stamped butterflies and then adhering a strip of the black and white sentiment towards the bottom. 

  • Bring in the same vellum background to the inside of the card then cut a 4" x 5 1/4" piece of Basic White cardstock to trim the top and bottom edges using the cloud border die.

Cardmaking Supplies:
The following link includes a list of supplies used for this card: https://s.tamp.in/X3jeyj 

I sure do hope that you have enjoyed reading this week's post and are inspired to create your own card using the TGIF sketch. 

Until next time ... 

Saturday, August 28, 2021

Saying goodbye with Delicate Dahlias

 Hello Crafty Friends!

I have a card sample that I created for a friend and co-worker of mine that will be moving into a new chapter of life in her career. 

I didn't want to pass up the opportunity to use the Delicate Dahlias stamp set from the 2021 Sale-a-Bration brochure.  This exclusive stamp set can only be earned for FREE when you purchase $50 or more in current Stampin' UP! products.

This sweet card is not the typical card size. I made it larger so that our office folks can have plenty of room to sign it. The finished card size is A9 (5 1/2 x 8 1/2).


 I CASE-D (Copy And Share Everything) this card from Simone Bartrum that had a few project ideas she showed on Pinterest. I loved the layout she created for the card and I made my card similar with a few different elements and different colors: Polished Pink and Mint Macaron. 

Cardmaking Tips

  • finished card size is 5 1/2" x 8 1/2" from Polished Pink cardstock.
  • The Basic White mat measures 5" X 8"
  • The Mint Macaron piece measures 4 1/4" x 7 7/8"
  • Use the Scalloped Contour Die to trim the left edge of the Mint Macaron piece after stamping the Dahlia images using Mint Macaron ink.
  • Cut 2- 1/4" strips of the Be Dazzling Specialty Paper to adhere toward the left edge of the Mint Macaron piece. (This is only available for FREE as part of the Sale-a-bration promotion).
  • The Dahlias, small flowers, and leaves are stamped on Basic White cardstock and fussy cut to adhere to the card front with dimensionals.
  • The last little touch is to place some 2021-2023 In-Color jewels as shown.
  • The inside of the card is kept simple and the sentiment is from the Inspired Thoughts stamp set.

Card Supplies
The following link is a list of all the supplies used to make this card, except for the Sale-a-bration products (Be Dazzling Paper, Delicate Dahlias Stamp set): https://s.tamp.in/Yrli51 


I do hope that this card will bring a smile to my friend's face and that she will treasure all the best wishes that our office group wrote inside the card. 

If you would like to earn the FREE Delicate Dahlias stamp set, head over to my Online Store to begin shopping.

Let me know if you have any questions and feel free to comment below this post! I'd love to hear from  you.


Until next time ... 


Saturday, August 14, 2021

#TGIFC329 Sketch Challenge Meets 'To the Moon'

 Hello Crafty Friends! 

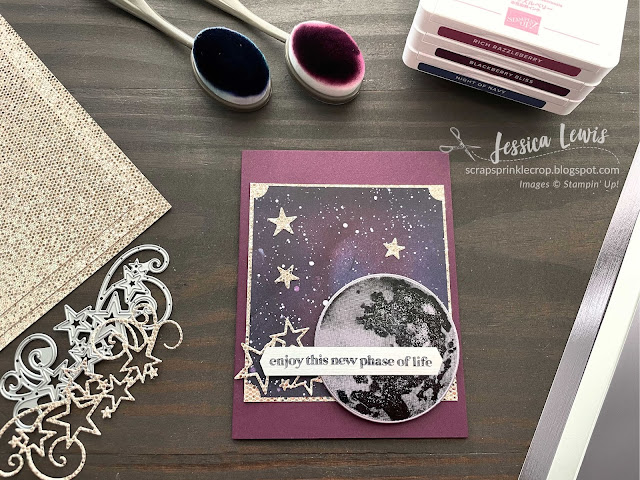
I'm so excited to share the fact that I finally got to use the To the Moon stamp set. I've been itching to find an occasion to use it and I went ahead and gave it a go with this week's TGIF Sketch Challenge #329.


I'm quickly finding that I'm in need of cards that will fit into the Congratulations category for new baby or for retirement, so this card would fit either of those occasions.


As with any sparkly and shiny card, the pictures doesn't do it justice! This lovely Be Dazzling specialty paper glimmers and sparkles in every direction! This paper is so fitting with the moon and the background of this card! 

The background was inspired by a pin I found on Pinterest as I searched for pins related to the night sky. 


 I will soon be posting Here's a video tutorial on how I created this card later this week. But until then, see my tips below. (Updated 8/19/21)


Cardmaking Tips

  • The Blackberry Bliss cardstock card base measures 4 1/4" x 5.5" 
  • The background piece is cut to 3 3/4" x 4" and is layered onto a piece of the Be Dazzling specialty paper that measures 4 1/8" x 3 7/8" .
  • Use Blackberry Bliss, Rich Razzleberry, and Night of Navy inks along with the blending brushes to create the night sky background. A few sprinkles from a blend of white re-inker and water is a quick way of creating the stars.
  • The background piece has the corners cut out using a 1/2" circle punch.
  • Use Stazon ink to stamp the moon image onto the Silver Foil paper (matte finish). Cut the moon using the 2 3/4" circle die. 
  • For the sentiment, cut a 1/2" x 3 3/4" strip of Silver Foil (mirrored finish) and stamp the sentiment onto the strip using Stazon ink. Use the Banners Pick a punch to finish off the ends.
  • Use the stars and swirls die from the Stitched Stars Dies out of the Be Dazzling specialty paper and place onto the card front as shown.
  • The inside of the card is kept simple while using some of the leftover pieces from the stars and swirls cut out. The "congratulations" sentiment was stamped using Blackberry Bliss ink.


Cardmaking Supplies

For a full list of all the supplies used in creating this card (minus the Be Dazzling specialty paper), click on the following link: https://s.tamp.in/mdzrEx 


Let me know your thoughts about my creation for this week's challenge! I'd Love to hear from you in the comments below.


Until Next Time ... 

Thursday, August 5, 2021

#TGIFC327 Banner Love using the Penguin Place bundle

Hello Crafty Friends! 

I'm jumping on the TGIF Challenge #327 this week to show you what I created for the bonus inspiration challenge using banners and merged it with the Penguin Place Bundle


I've had alot of play time with this adorable bundle from the 2021 Holiday Mini Catalog (pg.33) by Stampin' UP! and have had TOO much fun creating with it. It's such a versatile bundle that can be used for many different occasions.


As I put together my creations, I wanted to be able to give this away to two little friends of ours that were celebrating their birthdays 
(girl-age 4 & boy- age 6). Naturally, I made a masculine and feminine version of the same card.  


Cardmaking Tips 
  • The colors I chose were inspired by the colors shown in the Penguin Playmates designer series paper from the Sale-a-Bration catalog: Balmy Blue, Basic Black, Calypso Coral,Fresh Freesia, Just Jade, Misty Moonlight, Soft Sea Foam. You can only get this paper for FREE when you spend $50 or more in product.

    • Use the 2nd largest stitched rectangle die to cut out a rectangle from Basic White cardstock. This is where you'll be placing all your elements.
    • Use a blending brush and some ink to create a subtle background behind the penguin. For the masculine version, use Balmy Blue. For the feminine version, use Fresh Freesia
    • The "Happy" & "B day" was trimmed up from the Birthday Chick dies. For the masculine version of the "happy", I used Balmy Blue cardstock and then offset some Basic Black behind it. For the feminine version of the "happy", I used Fresh Freesia cardstock and then offset some Basic Black behind it.
    • The banner was created using the triangle shape from Ice Cream Cone Builder Punch and punched out from the Penguin Playmates DSP.
    • The letters for "B day" were individually trimmed and placed onto a 1/2" circle from Basic Black cardstock then adhered onto the banner with dimensionals. 
    • The masculine card uses the Soft Succulent 3/8" open weave ribbon for the banner but I did use my Balmy Blue Stampin Blend to color ONLY on the edge of the ribbon so I could trim it to fit along the top of the banners. Same thing for the feminine card (minus the Stampin' Blend) using the Fresh Freesia 3/8" open weave ribbon.
    • The balloons were stamped onto their respective cardstock, cut out and popped up with a dimensional. 
    • The last little touch was to place a few 2021-2023 In Color Jewels in some places.


    • The inside of the card was kept fairly simple as you can see above and below.  


    CARDMAKING SUPPLIES

    To view and order from the full list of supplies I used for these projects, minus the Penguin Playmates DSP, click on the following link: https://s.tamp.in/sL7-9H 


    This is all I have for you today! Please let me know in the comments which version of the card you like better. I'd love to hear from you!!! 

    Until next time...

    Tuesday, August 3, 2021

    2021 Holiday Mini Catalog & Sale-a-Bration

    Hello Crafty Friends!

    It's a SPECIAL day in the Stampin' UP! world with the LIVE release of the 2021 Holiday Mini Catalog and the 2021 Sale-a-bration (part II) brochure!!!

    THE HOLIDAY MINI CATALOG

    The Mini Catalog is your passport to stunning seasonal projects! It contains all the products you’ll need to craft, create, and celebrate during the fall, Halloween, Christmas, and more.

    View the digital version of the catalog by clicking the image below:


    Watch these short product videos, and get to know the new mini catalog.

    Sweet Stockings Suite Collection


    Painted Christmas Suite collection 


    Gingerbread & Peppermint Suite Collection 


    Peaceful Place Suite Collection


    Harvest Meadow Suite Collection 


    THE SALE-A-BRATION (SAB) BROCHURE

    SAB is one of SU!'s biggest promotions of the year. It’s packed with perks for demonstrators, overflowing with opportunities for customers, and filled with fun for everyone! 

    During Sale-A-Bration, you can earn FREE, exclusive products for every $50 USD and $100 USD you spend. You can also enjoy unique, unbeatable benefits when you host a party or join the Stampin’ Up! family!


    View the digital version of the catalog by clicking the image below:


    There are 3 ways to Sale-a-Brate...

    1. Shop - There are two Sale-A-Bration spending categories: a $50 spend and a $100 spend. When you spend at least $50, you have the chance to choose a $50 spend Sale-A-Bration product for free! When you spend at least $100, you have the chance to choose a $100 spend Sale-A-Bration product—or two $50 spend products—for free.
    2. Host - When you host a party and reach a certain amount in sales (see the chart on the host page in the July–December 2021 Mini Catalog for more information), you can earn the In Your Words Stamp Set (item 156619) for free! Even if you reach this certain amount on your own outside of the party, you can earn the same stamp set for free through my Online Store. Simply add it to you cart the same way you would with any other Sale-A-Bration product! 
    3. Join - If you decide to sign up as a Stampin’ Up! demonstrator during Sale-A-Bration, you’ll get to pick a qualifying bundle from the July–December 2021 Mini Catalog to add to your Starter Kit—for free! There couldn’t be a better time to join the Stampin’ Up! family. Click HERE to view the bundles as part of this promotion.

    RESOURCES

    DSP Color Coordinating Chart
    I put together this Chart for you to keep on hand when creating your projects. They come in VERY handy to quickly see what coordinating colors are in each set of DSP. I LOVE using mine!

    Be sure to print this out in high quality so you can see the true colors. Click on the image below to view the PDF.
    This chart can also be found in my Free Tutorials tab at the top of this blog page. 


    Shopping List 
    Feel free to print out this Shopping List to jot down the products you want first. 


    MORE INFORMATION

    Catalogs


    If you would like to have your very own printed copy of the catalogs, please contact your local demonstrator or if you don't have a local demonstrator, you may contact me by clicking on the E-mail me icon on the top right side of this page.


    Online Store
    If you're ready to Shop Online, head over to my Online Store then click on "Shop Now". 


    Penguin Place Class
    Get started on creating with some new products from the Holiday catalog by signing up for my Penguin Place Class!!! This adorable and fun kit is a MUST have for creating some projects with one bundle for multiple occasions! 

    For all the details and how to sign up are here


    There's so much information to take in but I recommend starting off by taking a look at those catalogs and videos to get you warmed up! 

    Please don't hesitate to reach out to me for any questions you may have!

    Until next time ...