Wednesday, October 12, 2016

Upcoming event in November

Golly, the holidays are coming a lot sooner that I really want! Nevertheless, being prepared ahead of time is key to a less stressful and more enjoyable holiday!

If you live in the Rowlett/Dallas area, please join me for a Christmas workshop 
on Friday, November 11th at my place! It's on a come-and-go basis anytime between 9am-3pm. You have the choice of making one kit or both as shown below:


Option 1: Stitched with Cheer kit
  • You will be making 18 Christmas cards (6 each of 3 designs) as shown in the Stitched with Cheer kit.
  • Cost for making the cards, including all supplies, is $29.
  • You have the option of purchasing your own coordinating Stitched with Cheer stamp set; cost for stamp set (includes tax) + supplies is $52.


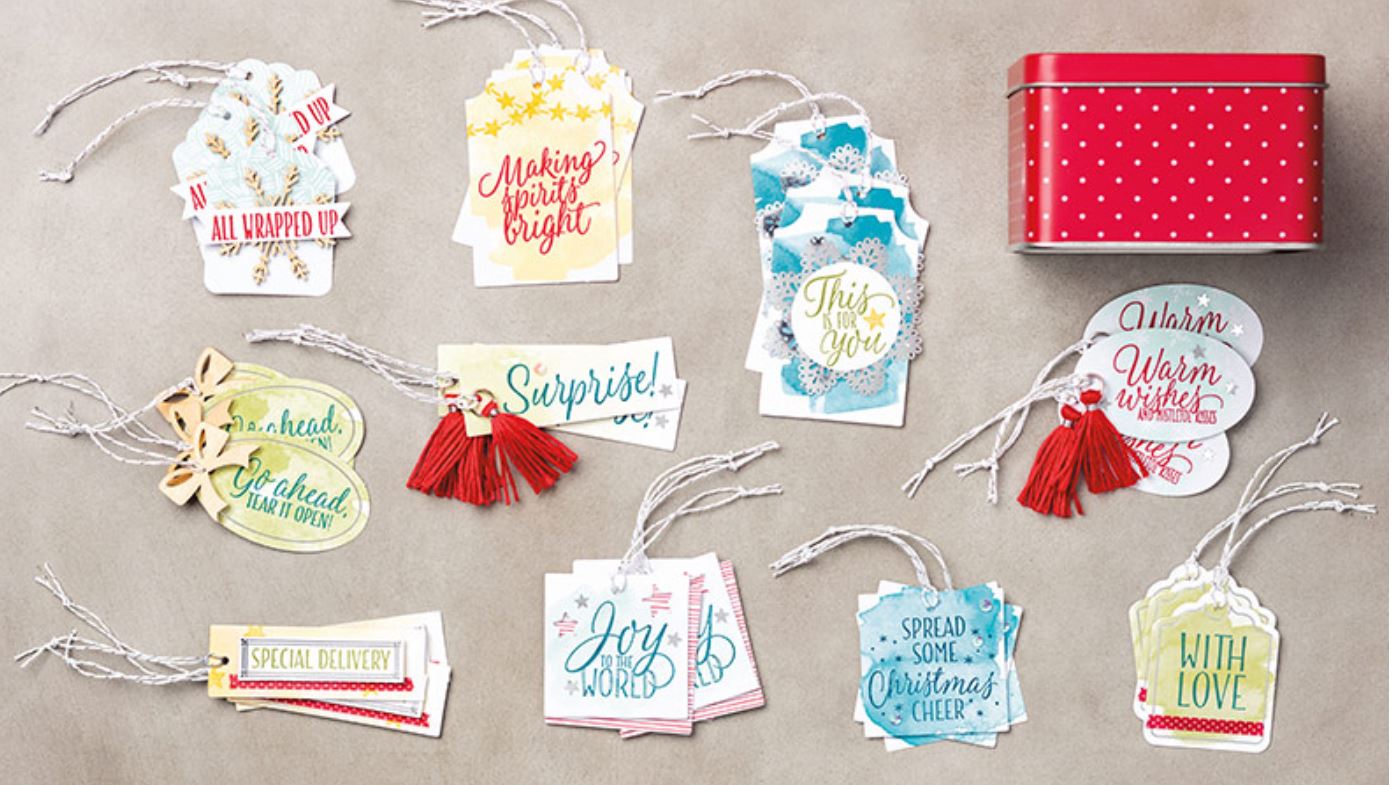
 Option 2: Tin of Tags kit
  • You will be making 30 Christmas tags (3 ea of 10 designs) as shown in the Tin of Tags kit.
  • Cost for all supplies needed is $27.
  • If you would like to purchase the coordinating Tin of Tags stamp set; cost for stamp set (includes tax) + supplies is $50.


To RSVP, please e-mail me by 
Monday, October 31st. You must have your payment in to me (via PayPal) by that day.

I will provide snacks and drinks throughout the day.

Monday, September 26, 2016

Petals & Paisleys Frame

The 2016 Holiday Catalog is filled with beautiful décor ideas for the upcoming holidays.
I personally love the Petals & Paisleys stamp set because of it's versatility when creating décor . I particularly loved the frame on the right that is on page 46 of the catalog, so I cased it!

Pg 46 of the Stampin' UP! Holiday Catalog


Here's my version of the frame:


Some tips:
  • The frame is 12"x12" that I purchased at Hobby Lobby.
  • I used the 12"x12" copper foil polka dot sheet from the Petals & Paisleys DSP.
  • The Copper Foil sheet was cut to 8.25"x8.25"
  • The heart design was created by cutting a heart shape using my Silhouette to about a 7" width by a 6" height. Using a pencil, I traced the outside edge of the heart shape then carefully stamped around the edges and inside the heart until I filled it. The white paper was trimmed to 7.5"x7.5".
  • I finished this piece of art by stamping the sentiment on a piece of vellum with bronze embossing powder.


This project was truly fun & simple to create and sure hope you enjoyed it as well!
Until next time....


Supplies Used:

Thursday, September 1, 2016

2016 Holiday Catalog

The Holiday catalog that many have been anticipating is here! Feast your eyes on this...


For your convenience, I've created two versions of the coordinating colors in the catalog, located in my Tutorial & Cheat Sheets tab:

  1.  Coordinating DSP with colors
  2.  Coordinating DSP - Text Only

Also, featuring this month is the Special Offers! See week 1 of the specials by clicking on the image below...

Wednesday, June 1, 2016

Stampin' UP's new 2016-2017 Annual Catalog

The time has arrived for the new 2016-2017 Annual Catalog! Get excited for all the new products, awesome project ideas, and much more!

Click on the catalog image or link below!


2016-2017 Annual Catalog


With the new catalog comes the following:

  •  The latest DSP coordinating colors chart that I put together (inspired by Mary Fish). Choose from 2 versions: text only or the actual colors with text.
    •   located under the Tutorials and cheat sheets tab above.
 
  • 15 wonderful videos featuring different products in the catalog.
 
  • $35 in Extra Stampin' Rewards
  • 2 FREE stamp sets when you join the Stampin' UP! family.
http://www.stampinup.net/esuite/home/paperfun/jointhefun


  •  In order to kick-off the new catalog, I'm hosting a New Catalog Open House on Friday, June 10th at 6:30pm (CST). If you're in the Dallas,TX area be sure to RSVP for some new catalog fun! I will be featuring the Perfectly Wrapped project kit with the make-n-take.


Contact a demonstrator in your area now!
 If you don't have a Stampin' UP! demonstrator in your area, I would love to help you get your hands on a new catalog. Simply contact me via e-mail shown on the link to the right of this page.
 
 I hope you enjoy the new catalog as much as I am! Have a wonderful week!!!


Monday, April 18, 2016

Retiring List

Here we go.....the retiring list from the annual and Occasions catalogs are here and ready for your viewing. 

Click on the image below to get started.


Don't hesitate to e-mail me or contact me at any time if you have any questions.

Sunday, April 17, 2016

Happy Admin. Day

I got a head-start on a card for our administrative assistant at work (April 27th) for Administrative professionals Day. I do hope she will enjoy this special card that I made just for her.


 I had posted on my facebook page of my sketch of what I planned on doing. Although it really never does come out exactly the way you plan it, I know it always helps me to have a plan of what I want to do.


 I am pleased with the results. The inside of the card had to be especially made as well since I had to have plenty of space for my co-workers to sign the card. If you notice on the bottom left side there is a space that says "open". She will flip the page open to the space where all of her co-workers signed a special note for her. It's essentially a card within a card that flips open from left to right.


The phrase in the card was simply printed onto the cardstock from microsoft word before I cut it to size. 


Supplies Used:
  • some retired items: 
    • coastal cabana cardstock
    • coastal cabana ink
    • silver "slider" button

Tuesday, February 9, 2016

A soaring Birthday

Hello! Last week I had the opportunity to design a masculine card. I actually doubled up for two upcoming February birthdays: one for my 17-yr old brother and one for my sweet husband!

My card sketch comes from Teneale Williams' Card Sketch 32 as shown below.


I turned the sketch 90° and followed the layout as shown. I did decide to use the retired ticket punch for the tab, but if you don't have this one, you can try the washi label punch (this was my second choice). 


I find myself looking for a masculine design often and I'm so glad that SU! continues to release stamp sets that lend itself to masculine designs. In this case, the Send me Soaring stamp set is perfect for the two guys in my life. 

You can only get this FREE exclusive stamp set when you make a $50 purchase during Sale-a-bration (ends March 31st). Go to my Online Store to view more SAB products.


Supplies Used:

Wednesday, January 20, 2016

Party Wishes Birthday card

Stampin' UP! does it again.......isn't EVERYTHING in the 2016 Occasions catalog and Sale-a-bration (SAB) brochure just wonderful?! I do hope you agree with me!

I recently hosted an Open House to introduce the 2016 Occasions catalog and I want to show you my make n take.

CARD FRONT


INSIDE OF CARD

This card came together pretty quickly once I sketched out what I wanted to do. My card is pretty much a "caseing" of the card shown on page 10 of the SAB brochure as shown below.


STAMPIN UP! CARD FROM PG10 OF SAB BROCHURE

Notice I created a birthday hat by turning the ice cream cone from the Honeycomb Hello stamp set upside down. I trimmed it to fit on top of the little chick's head.

PARTY HAT CLOSE-UP


Supplies Used:

If you would like to re-create this card, you can find my FREE card tutorial under the "tutorials and cheat sheets" tab at the very top of this page.

If you would like to receive your very own copy of the catalog and SAB brochure, please contact your local demonstrator. If you don't have one, you may contact me and I will get you your FREE copies to you right away!

.....Until next time!