Thursday, December 7, 2023

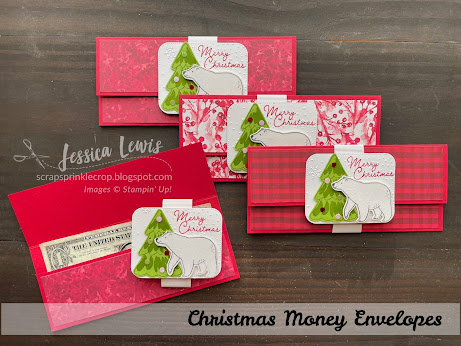
Christmas Money Envelopes

 Hello Crafty Friends!

It's been a while since I've joined in on the TGIF Challenges and am excited to share my creation with you for their color challenge.

I took advantage of the color challenge to create a few money/check envelopes for Christmas using the Beary Cute Bundle from the 2023 Sept.-Dec. catalog by Stampin' UP!.

I'm sad you can't feel my polar bear though... he feels velvety soft since I chose to you use the white velvet paper (retired) for him.


Envelope Making Tips:

  • Finished size: 6-3/4" x 3"
  • Cardstock/Paper Dimensions:
    • Real Red Cardstock base: 6-3/4" x 7"; scored at the long side at 2" & 5".
    • 2 pieces of Joy of Christmas DSP (sold out): 1-3/4" x 6-1/2"
    • Belly Band: (1) 1" x 7-1/2" strip of white Textured Shimmer paper
  • Be sure to use StazOn ink to stamp on the white velvet paper (retired) in order to avoid smearing the image.


If you didn't know already, which I hadn't paid attention until recently, lots of items I used here are not orderable or sold out. The Joy of Christmas DSP has sold out and is no longer available for purchase. Thankfully, you can easily swap out a different DSP to show off the Real Red color in the paper. I would recommend the Traditions of St. Nick DSP or the One Horse Open Sleigh DSP as some alternatives.


Envelope Making Products:
There are a few items on this list that I need to inform you on the status of:
  • Nested Essentials dies - available week of Dec. 25th
  • Snowflake embossing folder - available week of Dec. 18th
  • Bone folder - available week of Dec. 18th 
  • Beary Cute Bundle & punch - Sold Out
  • Joy of Christmas DSP - Sold Out


Thank you for stopping by! I would love to know your thoughts on those "Beary Cute" envelopes in the comments section below this post.

Until next time...

Saturday, November 25, 2023

Celebrating a 75th Birthday with "It's a Science"

Hello crafty friends!

I do hope you've had a great week this week of Thanksgiving!

I've been quite busy with many other things going on and haven't been able to publish many posts lately. However, I do want to share a special card that I just created yesterday for my father-in-law's 75th birthday.

This card features the It's a Science stamp set on a fun-fold card. My FAVORITE part was the "foam" coming out of the flask that goes perfectly with the sentiment. 


Cardmaking Tips:

  • Finished card size - 6" x 6"
  • fun fold card measurements were CASED from Mitosu Crafts
    • I only used 2 pieces of DSP (5-3/4" x 3-3/4") for the larger areas of the card.
  • Color Combo: Misty Moonlight, Daffodil Delight, Pool Party, Granny Apple Green and Coastal Cabana
  • To create the main background, stamp the cells and bubbles images onto a piece of watercolor paper with Daffodil Delight ink and Coastal Cabana ink. Alternate those colors using the two different images, being sure to clean your stamps in between.
    • Mix together some water from your water painter and a drop of Daffodil Delight ink on a small clear block then brush it directly onto the stamped images. Repeat the same with the Coastal Cabana ink.
  • Cut a 1/8" x 3" strip of Basic Gray cardstock, adhere towards the bottom of the main background piece as your table top.
  • Stamp the flasks image onto a piece of Thick Basic White cardstock and color with the following Stampin' BlendsMisty Moonlight, Daffodil Delight, Pool Party, Granny Apple Green 
    • fussy cut the flasks and adhere to the table top with liquid glue, except for the round bottom flask.
    • As for the round bottom flask, I chose to use some of my retired Snowfall Accents Puff Paint to make it look like the liquid was foaming out of the flask. Then adhere the flask to the card front using a couple of dimensionals.
  • Use the same paper that was created for the background image to cut out the paper on the clipboard and the small balloon.
  • The sentiment was cut out using the die from the Gorgeously Made dies.
  • The balloons were stamped and cut out using the Beautiful Balloons Bundle.

Cardmaking Supplies:
All the supplies used for this project are shown below, except for the Snowfall Accents puff paint which is retired.


I sure appreciate you stopping by today! I hope you are inspired to get more use out of your Snowfall Accents puff paint with today's project !

Until next time ... 

Wednesday, September 13, 2023

2023 Sept.-Dec. Mini Catalog

Hello crafty friends and happy Fri-YAY!!!

If you haven't heard the wonderful news already, Stampin' UP! has recently released the 2023 Sept. - Dec. Mini Catalog. It may be mini, but it’s mighty with all the fun new products it has to offer. From Halloween to Thanksgiving to Christmas, and all your celebrations in between, this catalog is the perfect way to ensure successful crafting during the holiday season!

Click the image above to view the digital catalog.


If you'd like to shop this catalog at my Online Store, click HERE.


Below are a few videos so you can see all the new products available to enhance your holiday crafting this year!

 2023 September Mini Catalog


Bundle up & Save


Designer Series Paper for every craft


Them Bones Suite

.


Joy of Christmas Suite


DSP Coordinating Colors Chart

I love to create the DSP coordinating colors chart for every catalog because it's a quick and easy reference for the coordinating colors for all the designer papers included within each catalog. It also gives me ideas of what colors go well together.

Feel free to print this out to use as your reference. I do recommend that you print it out in high quality so that you can view the colors best.

Click the image above to view the PDF


This is all I have for you this week. If you would like your very own personal copy of the Holiday catalog, please contact your local demonstrator by clicking on the Find a Demonstrator link at the top of the Stampin' UP! website. If you don't have a demonstrator, I would love to send you a printed copy of the catalog PLUS the Coordinating Colors Chart at no cost to you. 

Click on the Email Me link on the right side of this page to send me an email and provide me with your mailing address.


Until next time!... 


Thursday, August 31, 2023

Fall Themed Card using "Bird's Eye View"

 Hello crafty friends! Welcome!

I have been anxiously waiting for the fall season to arrive and I can already smell the Pumpkin Spice in the air! This is my absolute favorite season of the year and I want to jump start getting into the fall spirit by showcasing a few products from the All About Autumn Suite, on page 43-44 of the 2023 September-December Catalog by Stampin' UP!

  • PLEASE NOTE: This Suite is not yet available to the public until the Catalog goes live on Wednesday, September 6th. Therefore, I cannot show you any catalog images, per SU! policy.

This week's TGIF Challenge #435 prompted me to add some sparkle to my fall-themed creations and I can't seem to do these cards any justice with my pictures, but I promise there's shine and sparkle to those cards!


I created two cards with the same design but with different colors with the floating circle as the main focus. My choice would be the Moody Mauve card but the Pretty Peacock one is cute too! 

Which one is your pick?


Cardmaking Tips:

  • You can see a few sneak peeks of the new Designer Paper, stamp set, and Dies that are part of the All About Autumn Suite. Notice there's a decorative mask in there too (not a part of the suite).
  • I was inspired by the basic design of Eric Cerwin's card and put my own spin on it.
  • Cut 5 - 1/2" x 3-1/4" strips of DSP and adhere onto a 3-1/4" square piece of window sheet, spaced at about 1/4" apart. Use the largest circle die from the Stylish Shapes dies to cut out the circle.
  • Use the adorable Bird's Eye View Stamp Set and color each little bird with the following Stampin' Blends: Moody Mauve or Pretty Peacock, Daffodil Delight, Pumpkin Pie (for the beak). The Large bird was colored with Daffodil Delight and Pumpkin Pie (for the beak).
  • Use the two smallest leaves dies included in the die set to cut 6 leaves from the Oxidized Copper Specialty DSP and place them on the right side of the branch (colored with Copper Clay Stampin' Blends).
  • Add some Wink of Stella to give the little birds some shimmer and shine.

  • Don't forget about finishing off your card on the inside by carrying over a few simple elements from the front.


Cardmaking Supplies:
Most of the supplies you need are in the table below, except for NEW catalog products, tools and adhesives.


Thank you for joining me! Until next time ... 


Tuesday, August 29, 2023

A slimline card using "Reach for Stars"

Hello crafty friends!

I know.... I've been incognito around here since my last post in June. Summer was definitely a very busy time of the year and I know I'm about to get busy again as soon as we head into the holiday season.

While I have the chance, I want to share my CASE'd version of a slimline card created by Kaitlyn over at Stampin' Through the Catalog Facebook Page. Her card uses products from the Stargazing Suite from page 86-87 of the 2023-2024 Annual Catalog by Stampin' UP! 


Below is Kaitlyn's version of the card.
Her card was just gorgeous and I knew I had to CASE it for a birthday card I wanted to make for my brother.

I didn't stray very far from her creation because I LOVED every single aspect of her design!


Cardmaking Tips:
  • Finished card size: 3-1/2" x 8-1/2" .
  • For this card, it is BEST to arrange your design where you want them before adhering your pieces down. Start with nailing down the location of the twine behind the planets. 
  • Use the following colors for the astronaut image: Lemon Lime Twist, and Azure Afternoon Stampin' Blends ; Crushed Curry Stampin' Write Marker.
  • Use Silver Foil to cut out the stars and the large ring from the coordinating die set. As for the sentiment, make sure it is stamped onto the foil using Stazon Ink then trim around the words and flag the right end.
  • For the inside of the card, left side, create a pocket to be able to insert some cash or a check. The pocket was created from a separate piece of Black cardstock. BTW, The $1mill dollar bill is not real
  • You may use The Slimline Envelopes (retired) or create your own slimline envelopes.

Cardmaking Supplies

All supplies used for this slimline card are in the table below, except for tools and adhesives.


THANK YOU SO MUCH for stopping by today! Until next time....