Monday, January 24, 2022

#TGIFC352 - Masculine Valentine card

 Hello crafty friends! 

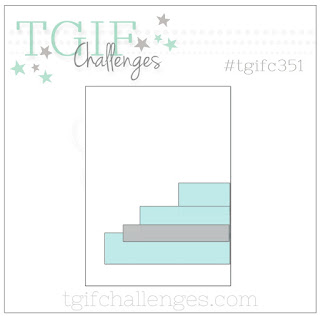
I've got a card to show you that was inspired by TGIF Challenge #352 and features a NEW bundle that will come out on Tuesday, February 1st called "Here Together".


I'll be sure to share more on the NEW bundle next week but until then, here's a sample using the bundle amongst other products as described below.

I wanted to make something masculine to give to my husband just in time for Valentine's Day! I'm already ahead of the game and I'm so glad I got around to it.


Cardmaking Tips

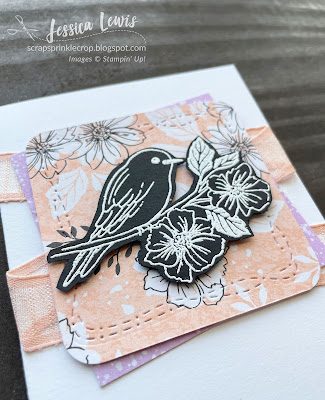
  • The finished dimensions are 4" x 4".
  • Use a piece of Pool Party cardstock that measures 8" x 4" and score at 4" along the length,  as your card base.
  • Use another piece of Pool Party cardstock that measures 3.5" x 3.5" and zip it through the Stampin' Cut & Emboss Machine with the Gingham Embossing Folder.
  •  use a 3-1/4" x 3-1/4" piece of the Simply Marbleous DSP to crumble up and distress the edges. Sponge some Soft Suede ink on all four sides. The DSP can ONLY be earned through our Sale-a-bration promotion.
  • Cut a heart out from the same DSP using the large heart-shaped die from the Give It A Whirl Dies. Adhere the heart to the center of the square DSP piece.
  • Stamp the hands image onto some Basic White cardstock using Soft Suede Ink. The color of the hands are from the NEW Natural Tones Stampin' Blends Pack (SU600, SU700) that are a part of the "Here Together" collection. Use a little Cherry Cobbler marker to color the nails on the hands.
  • Use your Dark Pool Party Stampin' Blend to color the black and white twine from the Playful Pets ribbon combo pack. Wrap it around your large DSP square 3 times and tie with a bow.
  • Stamp "Sure do love you" onto a 1/2" strip of Soft Suede cardstock with Versamark and heat emboss it with White embossing powder.
For the inside of the card, I used the banner shaped die from the Sweet Hearts Die set and heat embossed the sentiment with white embossing powder. The sentiment and the hearts are from the Sweet Conversations Stamp set. 

All the supplies, minus the Simply Marbleous DSP and the Here Together Collection (coming 2/1/22),  can be found in the following link:  https://s.tamp.in/AAeFlf

The Simply Marbleous DSP can only be earned for FREE after a qualifying order of $50 or more during Sale-a-Bration. Click here for more details.

Thanks so much for joining me this week! Don't hesitate to comment below and let me know your thoughts on this card! I'd love to hear from you.

Until next time... 

Thursday, January 20, 2022

#TGIFC351 - Rainbow of Happiness swing card

 Hello Crafty Friends! 

I'm back for another fun sketch challenge project brought to you by TGIF Challenges.


I took a bit of a different take to this sketch challenge by using the cute little cloud die-cuts from the Rainbow of Happiness Bundle to make for the horizontal bars in the sketch. Here's what I came up with.


The base template is a "window pop-out card" that I CASED from Jennifer McGuire. I fell in love with this type of design and had to try it to coincide with the challenge.

Cardmaking Tips:

  • there's essentially two main parts to creating this swing fold card: 1) a 4-1/4" x 5-1/2" Pool Party cardstock card-base with a frame cut out on the front, then 2) a 5-1/2" x 6-1/4" Pool Party cardstock piece that's scored at 2" and 4" on the long side. Follow along Jennifer's video on how to put this together.
  • use the stitched rectangle die (3"x4-1/4") to create the frame and window.
  • Use the Pool Party shade of the Sunshine & Rainbows Designer Series Paper, from the Sale-a-bration brochure, as the frame.
  • use the Stitched with Whimsy dies to create a stitched look for the DSP frame above.
  • Use the large die from the Brilliant Rainbows Dies to cut out a rainbow using the Rainbow Glimmer paper.
  • The clouds are cut out from the Brilliant Rainbows Dies from Basic White Cardstock. Also, cut out the same number of clouds +2 from Vellum then adhere to the Basic white clouds. This helps tone down the bright white. the extra two vellum clouds were adhered towards the top of the rainbow.
  • Heat emboss the sentiment, "You make me happy", onto a 1/4" x 2-3/4" piece of Rich Razzleberry piece of cardstock using white embossing powder. Use the Lovely Labels Pick a Punch to shape the left end.
  • The cute little bird from the Turtle Friends stamp set was stamped onto Basic White cardstock using Mango Melody ink. I used the fine tip of a Basic Black marker to dot his eye. Unfortunately, you need to fussy-cut this little guy out then adhere him with a glue dot.
  • For the inside of the card, I kept it simple with a few clouds cut out from the same DSP as in the front and placed randomly. 
    • Stamp the sentiment, "you make this...", onto a piece of Basic White cardstock and cut out with the 1-1/8" x 1-5/8" stitched rectangle die.
    • This sentiment piece layers perfectly on top of the "rectangle with rainbow on top" die cut.
Cardmaking Supplies:
  • Click on the following link for a full list of supplies used, minus the Sunshine & Rainbows DSP from the SAB brochure: https://s.tamp.in/qZY8gs
  • The Sunshine & Rainbows DSP can only be earned for FREE after a qualifying order of $50 or more.

I do hope that you enjoyed this project and would give it a try to make and design your own swing card!


Until next time ... 

Saturday, January 15, 2022

Nuts and Bolts Valentine Class

 Hello Crafty Friends!

I'm excited to introduce to you my first class of 2022 so mark your calendars and get ready to make some Valentines for your loved ones!

This class uses the Nuts and Bolts stamp set from the 2022 Jan-June Mini Catalog by Stampin' UP!.

This class will be held in-person at my home in Rowlett, Tx on Friday, February 4th at 6:30pm (CST).

There's also a To-Go option available.


Details:

  • I designed these projects to be quick and easy to assemble so that you can make multiples, if you like.
  • This class will make 2 cards and 2 coordinating candy boxes, including the candy. You can choose to make the masculine colors or the feminine colors or both.
There are 3 different options for this class:
 Option 1 - Full Class Kit - $50
  • All materials needed to make your projects (including envelopes), pre-cut and scored for you. This also includes the candy to go with your candy box. 
  • PDF and video tutorial

NOTE: for To-Go option, please add $8 for priority shipping, if not doing a porch pick-up.


Option 2 - Partial Class Kit - $30

  • Does not include the stamp set
  • 1 set of Real Red Stampin' Blends 
  • All materials needed to make your projects (including envelopes), pre-cut and scored for you. This also includes the candy to go with your candy box.
  • PDF and video tutorial
  • A FREE pack of Adhesive-Backed Hexagons as a Thank-You.
  • each additional set of 2 cards with 2 boxes will cost $5.00

NOTE: for To-Go option, please add $8 for priority shipping, if not doing a porch pick-up.


Option 3 - In Person only Kit - $20

  • This option is for only those attending the class in-person and would just like to pay for the materials needed to make your projects (including envelopes), pre-cut and scored for you. This also includes the candy to go with your candy box.
  • PDF and video tutorial
  • each additional set of 2 cards with 2 boxes will cost $5.00


Option 4 - PDF Tutorial Only - $10

  • this option is for those of you that don't want me to send you anything and only want the PDF and video tutorial. 
  • The PDF will be available via e-mail after you make your payment and beginning on the event date (2/4/22).
  • you will need to have the following supplies to create your projects:
    • Cardstock: Basic White, Petal Pink, Real Red, Granny Apple Green, Pool Party, So Saffron
    • Stamp Set: Nuts & Bolts
    • Ink: Memento Black, Granny Apple Green, Petal Pink
    • Stampin' Blends: Real Red, Granny Apple Green (to color the white ribbon)
    • Punches: Tailored Tag 
    • Ribbon: white 1/4" crinkle seam binding (#151326), Real Red 3/8" faux linen ribbon (#158129)
 

PLEASE NOTE: 

Your class kits will be ordered and prepared after the deadline of January 24th. This is a pre-order only and per Stampin' Up! policy, I can't have product on-hand ready to ship. Because of this, it takes some time after the deadline for me to order, cut, prepare and ship all the class kits. I hope to have the kits shipped no later than January 31st. 

Class Kits can only be mailed within the United States. If you live out of the U.S., you may only purchase the PDF. 

For those of you attending the event in-person, all your supplies will be ready for you on 2/4/22. Be sure to bring your own scissors and adhesive, if you have some.

If you have any questions and/or to Register for this class, please send me a request HERE. Registration will close on Monday, January 24th (12pm CST).


Wednesday, January 12, 2022

#TGIFC350 - Perpetual Calendar using Catching Butterflies

 Hello Crafty Friends! 

I'm coming back this week to share my entry for the TGIF Challenge #350, using a gorgeous combination of colors! 

My take on this week's challenge is not a card but a perpetual calendar that you can use over and over! This would make a great gift to that special someone at any time of the year OR you can just make one for yourself!

This calendar features the Days To Remember stamp set from the 2021-2022 Annual Catalog along with the Catching Butterflies stamp set from the 2022 Sale-a-Bration brochure. 


To switch from month to month, you can use the "belly band" to slide the window and match the day of the week to the 1st day of the month. I LOVE the clever design that Stampin' UP! did for this!!!!

Each month is removable just by using some velcro.

Watch this quick clip of how the calendar works.

 
Before you move onto anything else and if you're already intrigued by this project, could you please do me a HUGE favor and head over to TGIF Challenges and cast your vote for my submission by clicking the "Like" button towards the bottom of the post?

... and now... I've put together a list of supplies you'll need to create this calendar along with a video tutorial below. 

Calendar-making Measurements & Supplies

  • Base - an 8" x 6" piece of Basic White Thick Cardstock, scored at 4" and 6" along the length.
  • Top calendar piece - a 6" x 4" piece of Basic White Thick Cardstock
  • Number strip - a 6" x 2" strip of Basic White Cardstock
  • To adhere to calendar base - 2 pcs - 6" x 4" from Pattern Party DSP
  • background piece - a 6" x 3-3/4" piece of Brushed Metallic Cardstock
  • Window template from scrap cardstock - 2-3/4" x 1-5/8"
  • Frame - a 3-3/4" x 3" piece from Night of Navy cardstock
  • Belly Band - a 6-3/8" x 1" strip of Night of Navy cardstock
  • Month Strips - 12pcs 1-1/4" x 1/2" from Blushing Bride cardstock
  • a list of supplies used can be found in the following link: https://s.tamp.in/AiMlRN
  • Other supplies: Catching Butterflies stamp set, velcro dots (3/4") , Self-seal laminating pouches

Video Tutorial
Gather your supplies and follow along with the tutorial below.


Thank you SO MUCH for joining me today and PLEASE DON'T FORGET to head over to TGIF Challenges and cast your vote for my submission by clicking the "Like" button towards the bottom of the post.


Until next time...

Thursday, January 6, 2022

#TGIFC349 - Pocket Card with Ribbon closure

 Hello crafty friends!

I'm joining TGIF Challenges this week to present to you my version of adding a closure as posed by challenge #TGIFC349.

I created a pocket card using lots of NEW products from the 2022 January-June Mini Catalog and the 2022 Sale-A-Bration brochure.


Below is a video tutorial I created for this fun fold pocket card. Exact dimensions and supplies are further below.


Cardmaking Tips:

  • I CASED the dimensions for this pocket card from Cazz Boylan. The finished dimensions for this is 3" x 6" when closed and 6" x 9" when open.
  • Score a 12"x12" piece of Very Vanilla card stock at 6". Rotate the paper counter-clockwise and score at 3", 6" and 9". Rotate the paper counter-clockwise again and score at the 3" mark up to the last score line. Remove the 3 squares as marked in the image below. Trim off 1/8" from the right edge in order to fold in.

  • You'll need 1" x 6" Basic Black Cardstock - for border using Eden dies (card front).
  • You'll need to cut the following pieces from the Daffodil Afternoon DSP: 3" x 6" (card front), 3 pcs - 2 7/8" x 2 7/8", 3 pcs - 2 3/4" x 5 3/4"
  • you'll need to cut the following pieces from Very Vanilla Cardstock: 3 pcs - 2 1/2" x 5 3/4" , 2 5/8" x 2 5/8", a scrap piece for the sentiment (card front).
  • 16" length of Pale Papaya 3/8" ribbon.
  • other item used: Post it note tape from Amazon

Cardmaking Supplies: 

Thank you for joining me today and I would LOVE to hear from you on whether you'll give this project a try. 

If you are wanting your very own personal printed copy of the catalogs, please contact your local demonstrator. If you don't have one, feel free to contact me.

Until next time... 


Tuesday, January 4, 2022

2022 January-June Mini Catalog and Sale-A-Bration Promotion

 Hello Crafty friends & Happy New Year 2022!!!

Woweee, time has flown, hasn't it?!

I'm so excited to start the new year fresh with NEW Stampin' UP! products and projects from the 2022 January-June Mini Catalog and Sale-A-Bration Promotion!


All these products and MORE are available NOW at my Online Store, but before you head over there, allow me to share some valuable resources with you.


COORDINATING DSP COLORS

I've prepared two different versions of a very useful PDF of the new catalog and SAB Designer Series Paper (DSP) coordinating colors. This is useful in a few ways:

  1. Place it in your crafting space to quickly refer to the DSP included in the catalogs.
  2. You can visualize the coordinating colors and pull a couple to help you with your projects.
  3. Since the page # is included, you can view samples using this DSP in your catalogs.
Feel free to save either of these handy 2-page PDFs and print it out in high quality and on regular printer paper. 

Design 1


Design 2


Mini Catalog Videos

Watch these short product videos to get to know the new mini catalog. 

Flowering Fields Suite Collection - pg.14-17


New Horizons Suite Collection - pg. 42-43


Heart & Home Suite collection - pg.58-61


Sweet Talk Suite Collection - pg.8-10


Abstract Beauty Suite Collection - pg. 48-49


Layering Masks with Blending Brushes - pg. 65


SALE-A-BRATION (SAB)
  • SHOP : During the SAB period, you can earn exclusive products for FREE when you purchase $50 or more in current Stampin' UP! products. 
  • HOST : When you host a party and reach a certain amount in sales (see chart on the host page in the  2022 Mini Catalog), you can earn the Calming Camellia Stamp Set for FREE! Even if you reach this certain amount on your own outside of the party, you can earn the same stamp set for free through my Online Store. You’ll simply add it to your cart the same way you would with any other SAB product! 
  • JOIN : When you join my team as a Stampin’ Up! demonstrator during SAB, you’ll receive 2 FREE stamp sets after picking all of the products you want in your Starter Kit. Click here for more details on the benefits of joining my team.

Sale-A-Bration videos

Watch these short product videos to get to know the Sale-A-Bration catalog.

All about Sale-A-Bration

Daffodil Afternoon Coordination

Sunshine & Rainbows Coordination


"FRIENDLY HELLO" PROJECTS
I couldn't wait to jump into the Friendly Hello stamp set and DSP that I pre-earned in December. I'm in love with all the bright colors in the DSP!!!


As the New Year is here, I am setting out to attempt to reach my goal in using every stamp image contained in the stamp set. I did just that with the following 3 projects: 

Best Birthday Card


This is a Basic White Notecard (5"x3-1/2") and features two designs of the Friendly Hello DSP  along with the bird image from the Friendly Hello stamp set

Here's the inside of the card


Cardmaking Supplies: 
Click on the following link to view a list of supplies used, minus the Friendly Hello stamp set and DSPhttps://s.tamp.in/nzb-wa


Hello Friend Card


This "Hello Friend" card came together quickly since there was no fussy cutting around the flower image. I simply stamped and colored directly onto the DSP.

Cardmaking Supplies: 
Click on the following link to view a list of supplies used, minus the Friendly Hello stamp set and DSPhttps://s.tamp.in/B1I47k


Hello Bookmark


I put together a simple and quick bookmark with the Friendly Hello DSP and Stamp set using the remaining images I needed to use.

The base of it measures 4"x3-1/4" and is scored at the 2" mark along the length. Place adhesive on the top and right edges so that the bottom left is open to slide into your pages.

The ribbon was colored in Shaded Spruce using the Stampin' Blends Markers and some 1/2" white faux linen ribbon from the Flowers for Every Season Ribbon Combo pack.

Cardmaking Supplies: 
Click on the following link to view a list of supplies used, minus the Friendly Hello stamp set and DSPhttps://s.tamp.in/9SPbp8


Now go feast on the new catalogs and enjoy making some new and fresh projects this year!

Until next time ...