Showing posts with label sketch challenge. Show all posts

Wednesday, January 17, 2024

Shaker card using Perennial Lavender

 Hello & Welcome crafty friends!

I'm joining this week's TGIF Challenges #455 to create a shaker card that was inspired their sketch challenge.


I've been playing with the gorgeous *Perennial Lavender Suite and just adore the colors and design of this suite! You can find this Suite on page 23 of the 2024 Jan-April Mini Catalog.

*PLEASE NOTE: this Suite is unavailable for ordering until after the week of January 29th. 

The frame of the shaker card I created is made from the Lost Lagoon Soft Shimmer Paper, which really gave this card front a special touch.


Shaker Cardmaking Tips:
  • DSP for card front measures 4-1/8" x 5-3/8"
  • Strip of DSP on card front measures 1-1/2" x 5-1/2"
  • Stamp the greenery and lavender flowers onto a 2" x 3-3/8" piece of Basic White cardstock. The greenery is stamped full strength with Shaded Spruce ink then offset and stamped off. Repeat across the bottom the cardstock piece.
    • Use a small blending brush and some Highland Heather ink to add towards the bottom of the greenery. 
  • Cut the scalloped rectangle from Lost Lagoon Soft Shimmer paper using the 3rd largest die from the Scalloped Contours die set. 
    • on the back of the scalloped rectangle cutout, use your pencil and a ruler to mark the area you will need to trim, about 5/16" in from the edges. Use your paper trimmer to cut the area out and create a frame.
  • The small butterflies were created by coloring directly onto the stamps using Lost Lagoon, Berry Burst, and Gorgeous Grape Stamp N Write markers.
  • Don't forget to carry over some of the same elements from the card front over to the inside of the card.


Shaker Cardmaking Supplies:


---------------------------------

Thank you for visiting today! Feel free to comment below on your thoughts about shaker cards. Do you enjoy making them?

Wednesday, October 19, 2022

A peek at "Fitting Florets"

 Happy Wednesday!

I'm so glad I can get back into working on my own card creation after a busy two weeks of preparing for other events.

This week I'm joining in with TGIF Challenges #390 with a Sketch Challenge!


I chose to use a Collection that has not yet been released to the public, called the Fitting Florets Collection. This collection will soon be available for purchase beginning Tuesday, November 1st. These are an early release collection of products from the January 2023 Mini Catalog. 

The card I created is flowery and elegant with the soft combination of colors that are included in the Designer Series Paper (DSP): 


It was hard for me just to focus on one design in the DSP since they're all so beautiful! However, I did use both sides of this DSP. While playing with the sketch, I chose to turn it 90degrees (clockwise) then add a few flowers and leaves to represent the scalloped edge in the sketch. I'm happy with the turnout, how about you?!


Card-making Tips:
  • Cut the background piece of DSP to 4-1/8"x5-3/8". Use the plaid design from the Artistic Mix Decorative Masks to add a subtle touch of Soft Succulent ink to the DSP with a blending brush. Also add some splatters of white ink, randomly on the DSP.
  • Mat the finished piece of DSP onto a Basic White piece of CS that measures 4-3/16" x 5-7/16".
  • The flowery side of the DSP measures 3" x 4" and is mounted with dimensionals towards the top middle of the card front. This is so that the leaf pieces can slide under the left side of the DSP.
  • Stamp the leaf images using Balmy Blue ink onto Basic White cardstock and also Balmy Blue cardstock then cut out with the coordinating dies. 
  • Stamp the other "leaf" images using Blushing Bride ink onto Basic White cardstock and Blushing Bridge cardstock then cut out with coordinating dies.
  • The oval frame was cut from vellum, the flowery DSP, and Basic White cardstock.
    • Use some Soft Succulent ink and a blending brush to add some ink to the oval frame that was cut from Basic White cardstock.
    • The sentiment was stamped onto the vellum with Versamark ink then heat embossed with gold embossing powder.
  • The finishing touch on the card are the embellishments: Gold Adhesive Backed Swirls.


Card-making Supplies:

The supplies listed below does not include the products from the Fitting Florets Collection. Stay tuned for the release of this collection on November 1st.


Thank you SO MUCH for joining me today and I do hope you are looking forward to getting your hands on this elegant collection of products!

Until Next time... 


Thursday, September 16, 2021

#TGIFC333 Sketch Challenge Meets 'Hippo Happiness'

 Hello Crafty Friends! 

I'm so glad to be back and feeling more like myself after getting sick for a while without any energy to craft! Yeah, I got the 'Rona'...

Anywho, moving onto this week's TGIF Challenge #333.


As I got to thinking about what my layout should be like, I immediately thought of strips of clouds so I went off of this idea and also wanted to use the alcohol technique for my cloud background, since I hadn't tried it. The alcohol technique is where you spread some color onto a piece of vellum with whatever color you'd like of a Stampin' Blend marker then bleed the colors using at least 91% alcohol.

I feel like the design of the card came together pretty close to what I was imagining in my head so I went with it. In comparison to the sketch challenge, I rotated the card to portrait mode and ended up fitting only two strips instead of three.

This unicorn rainbow card has quite a few elements in it so allow me to share some.. 

Cardmaking Tips:

  • The card base is from Balmy Blue cardstock, cut to 11" x 4 1/4" and scored at 5 1/2". The card opens from bottom to top.
  • Use a 4 1/4" x 5 1/2" piece of vellum and your Dark Balmy Blue Stampin' Blend marker to add some color throughout this piece, focusing on the top and bottom edges. Using a waterpainter filled with 91% alcohol, dab the vellum to achieve the desired look. Let dry.
  • Adhere the top and bottom edges of the vellum onto the Balmy Blue card base using some Tombow glue and a sponge, making sure to spread evenly. 
  • The rainbow piece was also created using vellum. Use a pencil to sketch the outline of the rainbow (mine measures 4" wide on bottom and is 2 1/2" tall). Use the following Dark Stampin Blend colors from top to bottom of the rainbow: Poppy Parade, Mango Melody, Daffodil Delight, Granny Apple Green, Bermuda Bay and HIghland HeatherUsing a waterpainter filled with 91% alcohol, trace the rainbow lines to help blend the colors together. Let dry then cut out with your scissors.
  • The clouds were cut from 2 1/2" x 4 1/4" strips of Basic White cardstock using the cloud shape from the Basic Borders dies. Pop them up from the vellum background using plenty of dimensionals.
  • Use the same colors you used in the rainbow to stamp the starburst image repeatedly onto the clouds as shown. 
  • The unicorn image was stamped onto a piece of Basic White cardstock using Daffodil Delight and Granny Apple green ink. 
  • The unicorn was placed onto a separate cloud that was cut out from Basic White cardstock using the Give It A Whirl dies.
  • Give the card front some finishing touches with adding some Wink of Stella glimmer to the stamped butterflies and then adhering a strip of the black and white sentiment towards the bottom. 

  • Bring in the same vellum background to the inside of the card then cut a 4" x 5 1/4" piece of Basic White cardstock to trim the top and bottom edges using the cloud border die.

Cardmaking Supplies:
The following link includes a list of supplies used for this card: https://s.tamp.in/X3jeyj 

I sure do hope that you have enjoyed reading this week's post and are inspired to create your own card using the TGIF sketch. 

Until next time ... 

Saturday, August 14, 2021

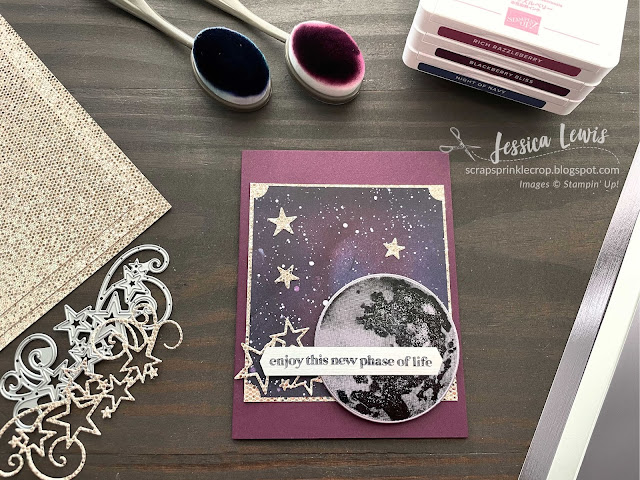
#TGIFC329 Sketch Challenge Meets 'To the Moon'

 Hello Crafty Friends! 

I'm so excited to share the fact that I finally got to use the To the Moon stamp set. I've been itching to find an occasion to use it and I went ahead and gave it a go with this week's TGIF Sketch Challenge #329.


I'm quickly finding that I'm in need of cards that will fit into the Congratulations category for new baby or for retirement, so this card would fit either of those occasions.


As with any sparkly and shiny card, the pictures doesn't do it justice! This lovely Be Dazzling specialty paper glimmers and sparkles in every direction! This paper is so fitting with the moon and the background of this card! 

The background was inspired by a pin I found on Pinterest as I searched for pins related to the night sky. 


 I will soon be posting Here's a video tutorial on how I created this card later this week. But until then, see my tips below. (Updated 8/19/21)


Cardmaking Tips

  • The Blackberry Bliss cardstock card base measures 4 1/4" x 5.5" 
  • The background piece is cut to 3 3/4" x 4" and is layered onto a piece of the Be Dazzling specialty paper that measures 4 1/8" x 3 7/8" .
  • Use Blackberry Bliss, Rich Razzleberry, and Night of Navy inks along with the blending brushes to create the night sky background. A few sprinkles from a blend of white re-inker and water is a quick way of creating the stars.
  • The background piece has the corners cut out using a 1/2" circle punch.
  • Use Stazon ink to stamp the moon image onto the Silver Foil paper (matte finish). Cut the moon using the 2 3/4" circle die. 
  • For the sentiment, cut a 1/2" x 3 3/4" strip of Silver Foil (mirrored finish) and stamp the sentiment onto the strip using Stazon ink. Use the Banners Pick a punch to finish off the ends.
  • Use the stars and swirls die from the Stitched Stars Dies out of the Be Dazzling specialty paper and place onto the card front as shown.
  • The inside of the card is kept simple while using some of the leftover pieces from the stars and swirls cut out. The "congratulations" sentiment was stamped using Blackberry Bliss ink.


Cardmaking Supplies

For a full list of all the supplies used in creating this card (minus the Be Dazzling specialty paper), click on the following link: https://s.tamp.in/mdzrEx 


Let me know your thoughts about my creation for this week's challenge! I'd Love to hear from you in the comments below.


Until Next Time ... 

Thursday, July 15, 2021

#TGIF324 Sketch Challenge using the Season's Blessings Bundle

 Hello & Welcome, Crafty friends!!!

I'm here to share with you a creation of mine that was inspired by this week's TGIF Challenge #324.


I took a different angle for this card by turning the card front to be in landscape mode instead of portrait mode. 


Then I used the lovely Season's Blessings Bundle and paired them with some beautiful fall colors (my favorite season!) that are Mango Melody, Calypso Coral and Early Espresso. I took these colors from the You're a Peach DSP coordinating colors.

CARDMAKING TIPS

  • Use the curved and stitched Basic Borders die to cut a piece of the You're a Peach DSP to adhere onto the card front. 
  • Use the Stampin' Write Markers: Calypso Coral, Mango Melody and Early Espresso to color directly onto the image and stamp onto a piece of Basic White cardstock. Cut out the leaves using the coordinating die.
  • Stamp the leaf images onto basic white cardstock using Calypso Coral, Mango Melody and Early Espresso (stamped off) three times and cut out with coordinating dies. The leaves will be placed onto the card front and onto the inside of the card. 
  • Cut out the basket using the die from the Pale Papaya cardstock. Trace around the die onto a piece of Crumb Cake cardstock and cut out with scissors. This piece will be a mat under the Pale Papaya basket.
  • The sentiment from the Many Happenings stamp set is stamped on Basic Black cardstock with Versamark ink and heat embossed with white embossing powder. Cut out with the coordinating Messages die.
  • To finish off the card front, use some Artistry Blooms sequins to place randomly on the card.
  • The inside of the card was kept simple as shown below.
Click on the following link to get a full list of supplies used for this card: https://s.tamp.in/zJBUs7 

This is all I have to show you today! I do hope you enjoyed my creation for this week's TGIF Challenge!!! Let me know in the comments below, I'd love to hear from you!

Until Next time... 


Thursday, May 20, 2021

#TGIFC316 - Sketch Challenge using Turtle Friends Bundle

 Hello & Happy Pre-Friday Crafty Friends! 

I'm super excited to share a card I put together that features one of my favorite stamp sets in the new 2021-2022 Annual Catalog by Stampin' Up!: Turtle Friends. I've combined this stamp set with this week's TGIF Challenge #316: Sketch Challenge.


1st ATTEMPT FOR CARD DESIGN
I tried and tried again on the design of my card until I got what I believe to be the best out of the three different designs I created.

It's funny how you have this idea in your head and it doesn't quite look like how you imagined. From this first sample below, I figured that the bright color strips were taking over the focus on the little turtles.


2nd ATTEMPT FOR CARD DESIGN
So I tried again and changed the colors of the cardstock strips to more of a monochromatic look and varied the widths of the strips too. Since some of the cardstock strips are a bit thinner, I had a little extra space to add a 3rd little turtle.

While I like this version better, I still felt like the white embossing took away from the focus of the little turtles. 


FINAL CARD DESIGN

This is when I developed my final version to remove the white embossing and just use some clear embossing. I also decided to add the cute little bird on top of one of the turtles as well as the clear-embossed hearts to resemble rain drops below the clouds. 


Those little turtles are cute, aren't they?! 

While this stamp set has a coordinating Turtle Punch, I made the mistake of just ordering the stamp set and not the bundle by using the wrong item code. BUMMER! But even if I did have the punch, I didn't need it for this card project. 

I hope to put together a video of how I created this card and upload it before the weekend so stay posted on that. See video below on how I put this card together. updated 5/21/21


CARDMAKING TIPS

  • Use your blending brushes and some Pear Pizzaz and Coastal Cabana ink to create the background.
  • The cardstock strip colors in order from bottom to top are: Soft Sea Foam, Pear Pizzaz, Old Olive, Garden Green and Mossy Meadow. There are two different widths I used for the strips and alternated them for each color: 3/8" x 4 1/8" and 1/2" x 4 1/8"
  • Once the strips are cut to the widths and lengths described, stamp the sentiments with versamark and use clear embossing powder and the heat tool to finish the strips.
  • Unfortunately, there's no punch or dies for the turtles and little bird so this does require some fussy-cutting. I colored the turtles using the following Stampin' Blends colors and stamped the shell image with the ink in "()": Crumb Cake (with a Soft Suede Shell), Soft Sea Foam (with a Soft Sea Foam shell), Old Olive (with a Mossy Meadow shell). 
  • Pop up the turtles on the left and on the right with a dimensional for some added dimension. Use a mini dimensional for the little bird.
  • The little bird was stamped on a Basic White piece of cardstock with Daffodil Delight ink and then I used the Mango Melody and Basic Black Stampin' Write Marker for the details. 
  • The clouds were stamped on a piece of Basic White with Balmy Blue ink that was stamped off twice to get a subtle color of blue. The clouds came from the Mountain Air stamp set which I cut out with the coordinating Majestic Mountain dies.
  • I carried over a few elements over from the card front onto the inside of the card as shown below. In order to keep the cutting and layering to a minimum, I had to do a little masking for the turtle and bird.


SUPPLY LIST

Click on the following link to view a full list of supplies used on this project: https://s.tamp.in/l4vWkS 


Well, this is it! I would love to hear your thoughts on the different card versions and which one you liked best. Comment below and let me know!

Until next time...