Hello, Hello Crafty Friends!
I'm back this week to share with you my latest creation using TGIF Challenges' Simple Stamping challenge.
If you're not familiar with the term Simple Stamping, this means that you only are to use stamps, paper, ink, and maybe even an embellishment.
For a lot of avid/advanced crafters, it can certainly be a challenge to go simple without adding all the layers! This was the case for me this week. However, I was relieved to keep it simple since I had a few of these to make for a group of friends.
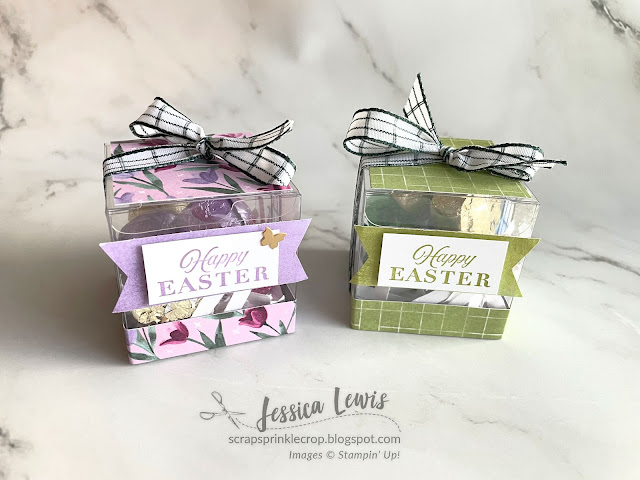
I happened to have some leftover Clear Tiny Treat Boxes (retired) in my Packaging stash so I was able to put together a masculine (Pear Pizzaz) and feminine (Highland Heather) version of an Easter treat box as you see below. I love how simple and cute they came out!
Since these treat boxes are retired, you can certainly use the 3-1/8" x 3-1/8" Acetate Boxes or even the Simply Classic Treat Boxes but keep in mind that the dimensions I describe below will be different.
Treat-Box Making Tips:
- Assemble the treat box and fill it with your choice of treats. In my case, I filled it with the ROLO caramel chocolate candies from WalMart.
- Using the Flowering Fields DSP, cut a 0.5" x 8" strip to adhere around the bottom of the assembled treat box.
- From the same DSP, cut a 1-7/8" x 1-7/8" to adhere to the top of the treat box.
- Cut a 17" piece of the Evening Evergreen Windowpane Check ribbon to wrap around the treat box.
- Use a glue dot behind the ribbon and onto the two sides of the box to help keep the ribbon in place once it gets untied by the recipient.
- Stamp the "Happy Easter" greeting from the Celebrating You stamp set onto a 3/4" x 1-1/4" piece of Basic White Cardstock. Mat it with a piece of DSP that measures 7/8" x 2-1/4" then flag the ends.
- Finish off the treat box with the adorable Brushed Brass Butterflies embellishment.
As an alternative, if you'd like to get a little outside of the Simple Stamping boundaries, you can use the Cloud Punch (love this thing!):
- BEFORE punching the paper, use the brush side of your coordinating color of Stampin' Write Marker to trace the outline of the shape while the paper is inserted into the punch.
- Punch the cloud out and adhere it to the front of the treat box then stamp your sentiment and add a little embellishment.
Treat-Box Making Supplies
Click on the following link to view and shop from a list of supplies used for this project: https://s.tamp.in/Nd8HrM
As always, I thank you for stopping by this week's blog post and hope you are inspired to create an Easter Treat to give away!
Let me know in the comments below on which box you like the best!
Until next time...


No comments:
Post a Comment