Tuesday, July 23, 2013

Stampin' UP! convention 2013 events

This is the most difficult post to write because of all the fun things I would like to share with you but don't worry, I will spare you from having to read my every detail of my trip to Utah ;o)


Day 1 of SU! Convention

I arrived the same day the convention started with plenty of time to grab some lunch before the opening general session began. My upline, Denise Sullivan, friends Caren and Carol, and I were at a really good Mexican restaurant called the Blue Iguana.


Then we were off to start the first general session with The Voice's Ryan Innes singing "Be the difference".
If you have time, you can watch the opening session yourself, below.


After general session, we had an opening social where there was demonstrator booths, project displays, a service project, and much more!

The service project was one the highlights of this night and I was so involved in it that I didn't take the time to take any pictures (I regret not doing that). Stampin' UP! created the opportunity for demos to participate in creating birthday kits for children in the Utah hospital that celebrate their birthdays as they receive their treatments. My heart is soo very glad for that opportunity. I heard that the kids received their gift and I'm sure their faces shone as they opened them. 

Next up, here are a few projects from the demonstrator's booths (one of which was a male demo, Brian King).

created by demonstrator Brian King
 
created by Hispanic demonstrator
Created by German demonstrator Jenni Pauli


beautiful project displays
project displays


The day went by super fast, but I was pretty tired after all the activities. I was amazed at all the beautiful projects demonstrators and SU! staff had created, there's so much to see! Pictures don't do them justice. You have to be there to really enjoy all the intricate details of each project.

I will share with you day 2 of my convention experience in a couple of days so stay tuned...

Until next time, check out the latest products and promotions on the right side of my blog page.


Monday, July 15, 2013

Stampin' UP! birthday

This past week has been hectic with all the personal stuff we have going on in our lives, plus I got sick, and had to get some card swaps put together, then work on stamp club projects...........it's a never-ending story, I suppose. I still enjoy having projects to make, don't get me wrong.

With all that said, we did, however, have a great time of stamping this past Saturday! We managed to put together a couple of quick and simple projects that only took us half the time it usually does. 


 Supplies Used:
  • cardstock: whisper white, daffodil delight, gumball green, silver glimmer paper
  • DSP: gingham garden
  • inks: island indigo, pear pizzaz, daffodil delight
  • stamps: label love, a fitting occasion, gorgeous grunge
  • punches: artisan label, 1" square (to flag the end), scallop edge border, 1 " circle
  •  

This fun & simple Lolli cover was cased from Carrie Cudney's beautiful project. See her video below the project recipe.

Supplies Used:
  • cardstock: wisteria wonder, bermuda bay, whisper white
  • inks: bermuda bay, wisteria wonder, melon mambo, daffodil delight
  • stamps: make a wish, itty bitty banners
  • framelits: apothecary art, itty bitty banners
  • ribbon: white 1/4" stitched grosgrain ribbon, white bakers twine (used to tie the cover on the lollipop stick)
  • stripes embossing folder & Big Shot 


Thank you for stopping by! See you again real soon!

Monday, July 8, 2013

Stampin' UP! Blog Hop


I'm super excited to welcome you to July's Go Stamp It sisters blog hop featuring some lovely and talented Stampin' UP! demonstrators.

You may have hopped on over from Sami's or Denise's blog! Aren't they both sooo good?! They definitely have an eye for CUTE!

This month, we are featuring the Around the World stamp set from pg 48 of the 2013-2014 Stampin' UP! Catalog.


This time around I decided to change it up a bit and go with decorating a picture frame (instead of a card) that I am preparing for a picture that we will be taking next month for our family vacation in Florida (HOORAY!).
9 3/4" x 7 3/4" frame holds 4" x 6" picture.

I am so glad that I put this together ahead of time that way I can just print the picture out and I'm ready to go! 

No need to invest a whole lot of time in this project because the designer series paper (DSP) does most of the work for you. I love the combination of shapes, colors, and print on this paper.

My tips:
to cut out the DSP for the frame: 
  • first cut the paper to the outside dimensions of the frame (in my case it was 9 3/4" x 7 3/4").
  • place the paper exactly where you want it but don't glue it down yet.
  • use your finger to locate the corners of the inside frame and use either your paper piercer or your craft knife, pierce each of the four corners of the paper where your picture would go.
  • remove the paper and connect the four corners so you can cut the middle out.....voila!

Supplies Used:
  • cardstock: crumb cake, gumball green, very vanilla
  • DSP: Epic Day This and That
  • stamps: around the world
  • inks: crumb cake, gumball green, basic gray, versamark
  • white gel pen
  • paper piercing template and paper piercer
  • other: decoupage glue, wood frame (I got mine at wal-mart) 

Your next hop is with the amazing Caren (click her link below)! You will love her project!

Thank you so much for hopping by and would love to hear your comments! 


Jessica: scrapsprinklecrop.blogspot.com (you are HERE)
Caren: creatingwithcaren.blogspot.com
Cali: calissimplystampinblog.blogspot.com 
Denise: gostampit.blogspot.com 
Sami: samisstampinspot.blogspot.com


Monday, July 1, 2013

Black & White with a POP of color

July has arrived and for many Stampin' UP! demonstrators, it's getting sooooooooo very close to CONVENTION in Utah. I'm super duper excited and so ready to party with all the ladies (some gents)!

I have been getting busy with my convention swap projects for a couple of weeks now and am going to share one of my swaps that I have created with you.

This first card below was my first attempt to creating the embossed border and you can tell that the embossed corners don't look so good.

This next card is much better when it comes to the embossed border! Let me share a couple of tips that I learned as I was making this card.


I absolutely love the look of a pop of color amongst black and white. Something about it....

My Tips:
  • create your own border with the simply scored borders plate (pg 178 of the catalog; item 126192)
  • you need to cover-up the same length of scallop on both sides of the paper as shown below.
  • begin scoring on the first full scallop.

 
  • rotate your paper 90 degrees and line up the scallop you already scored with half of the next scallop you will be scoring.
 
  • your scallops should meet and make a smooth transition from corner to corner.

  •  vellum adheres best with glue dots but make sure to adhere where they are not visible.
  • use the new mosaic punch to create the ends of the banner as shown below.


Supplies Used:
  • cardstock: basic black, whisper white, tangerine tango or pool party
  • paper: vellum
  • stamps: en francais, oh hello, a round array, chalk talk
  • inks: white craft, black stazon
  • punches: mosaic
  • tools: oval framelits, simply scored borders plate
  • tangerine tango or pool party embossing powder  

 Hope you enjoyed these quick tips and cards. Let me know what you think! 

Until next time...


Saturday, June 22, 2013

A Stampin' UP! summer day

I just got back from attending what my upline calls the Summer Stampin' Day and had a absolutely wonderful time!
A large group of ladies got together and stamped our hearts out with the cutest projects that Denise Sullivan and her friend Amy Storrie prepared for us.....SUPER CUTE!!!

Here's what we put together:

5"x7" framed art featuring the Eastern Elegance designer series paper

Stack of cards with matching basket that features the Gingham Garden designer series paper and washi tape.

Multi-fold scrapbook album featuring the Gingham Garden designer series paper.

Spa gift box featuring Tag a bag gift boxes, Eastern elegance paper, and chevron ribbon.

Spa gift box (showing inside contents: candle, towel, and bath salts)

I just cannot stress how these pictures do not do these cute projects justice, but I hope you enjoyed seeing these and are inspired to make your own!

Thank you for stopping by! Until next time.

Monday, June 17, 2013

Stampin UP father's day card & flower vase

My stamp club ladies got together this past Saturday to create some projects using the yummy products from the new 2013-2014 Stampin' UP! catalog !

This month we created a unique and eclectic Father's Day card using the Show & Tell photopolymer stamp sets. I really like the color combinations for a masculine card.


My tips:
  • create long arrows by inking & stamping half of the image first, then the other half next to it.
  • SU's online class-Seeing the Possibilities (item 134532)-provides all the basics you need to make the most of their newest photopolymer stamp offerings
Supplies used:
  • cardstock: basic gray, smoky slate, bermuda bay, chocolate chip, whisper white
  • inks: chocolate chip, basic grey, bermuda bay, white kraft ink
  • stamp set: show & tell 1,2 ; designer typeset
  • embellishments: neutrals candy dots    


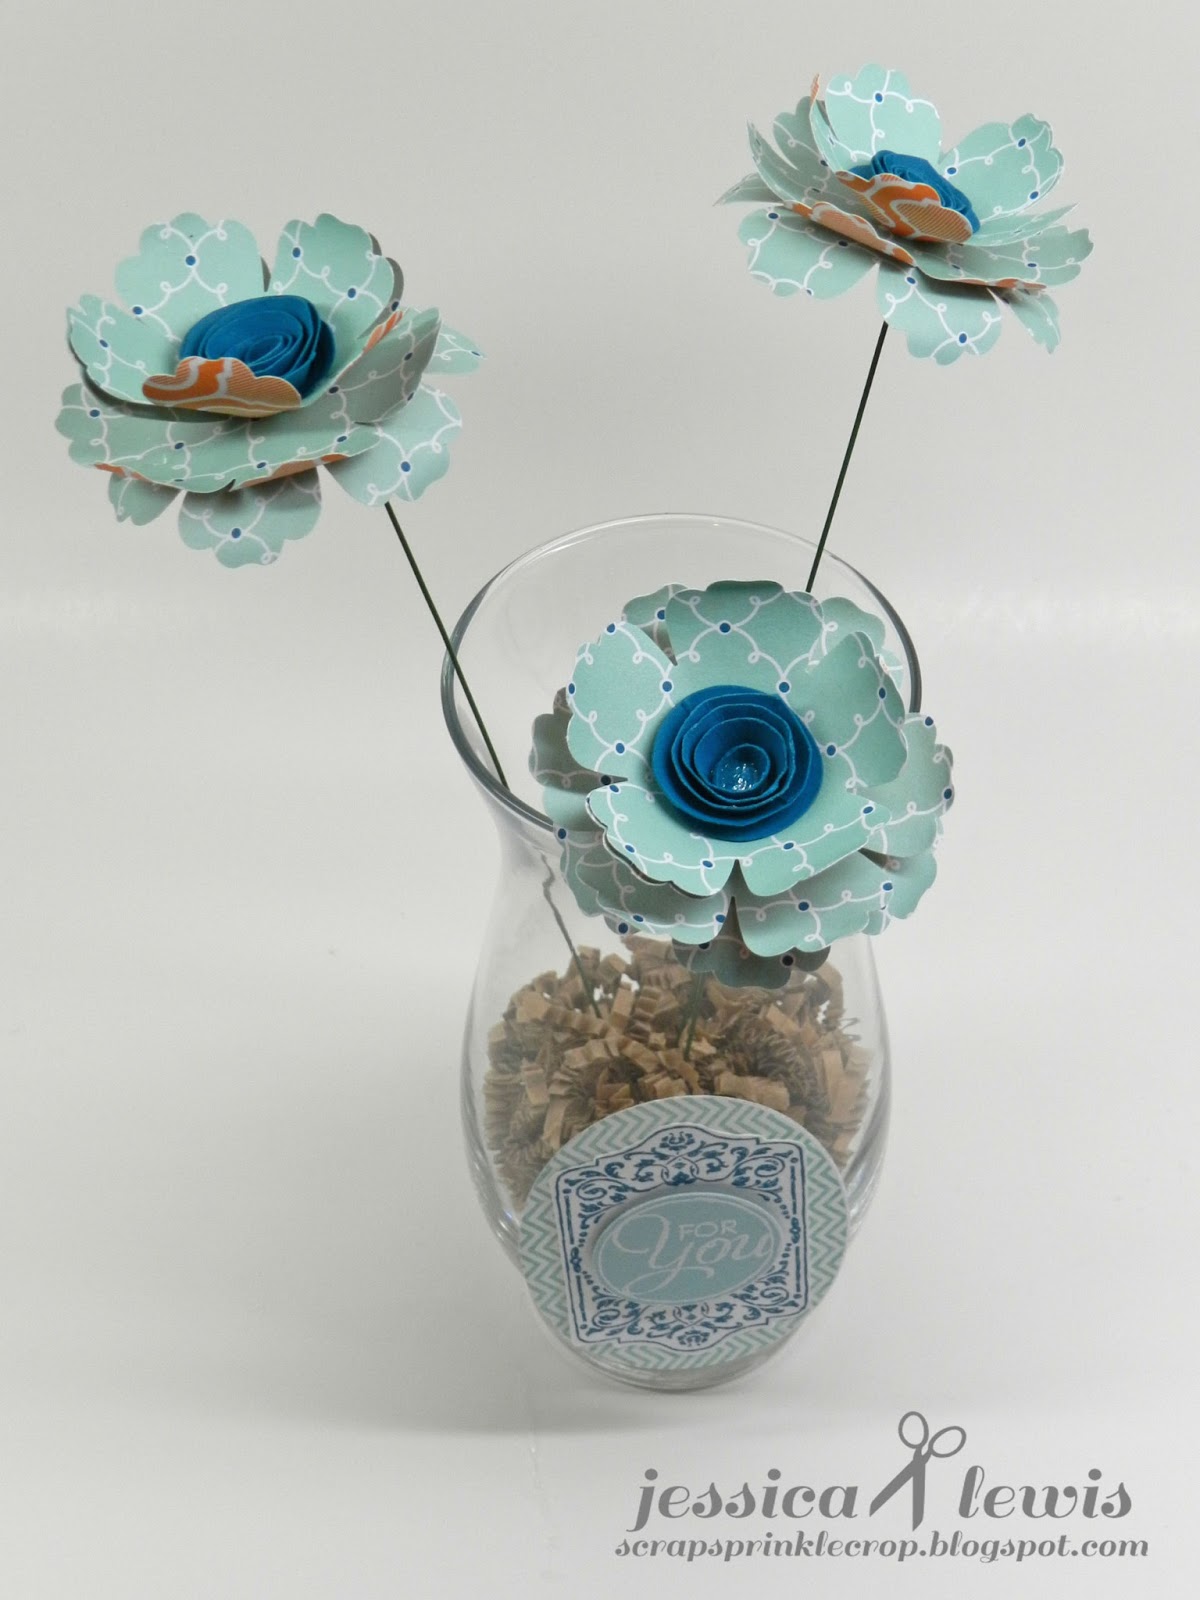
 Our next project is not necessarily a Father's day gift but a simple home decor item that can strike a good conversation in anyone's home!


My tips:
  • punch out 3 flowers. curl two of the flower's petals upward then 1 of them downward.

  • the top flower is made by cutting a slit between two of the petals toward the center of the flower. Then overlap one petal over the other to create a raised flower (you now have 5 petals instead of 6)
  •  create the rose shape in the middle of the top  flower by punching out a 1 3/4" circle and cutting it into a swirl shape; curl from the tip with a skewer to create the rose.
  • works best if you use a low-heat glue gun.
  • cut 3 different lengths of floral wire to offset your flowers.

Supplies used:
  • cardstock: island indigo, whisper white
  • inks: pool party, island indigo, versamark
  • designer series paper(DSP): quatrefancy 
  • stamp set: oh,hello; chalk talk
  • white embossing powder & heat gun
  • other: floral wire, 6 1/2" tall vase (dollar store), filler paper

 Hope you enjoyed today's post! I would love to hear feedback from you, so tell me what you think!

Until next time!....

Friday, June 7, 2013

Stampin' UP! quatrefancy paper

It's a beautiful and cool morning today! The sun is finally been out after all the rain and cloud cover we've had.

I just want to do a quick post on a recent card I made for a co-worker of mine that will be soon expecting her first baby boy. Pure sweetness!

 Boy, are you up for an exciting year of new 2013-2014 Stampin' UP! products! From the new colors to stamp sets to beautiful designer paper, you will LOVE it all!

I fell in love with the quatrefoil design printed on the window sheet that comes in the Quatrefancy specialty paper. You can use it by itself or you can place any color paper you desire behind it to fit your project colors.

I used coastal cabana as my color behind the window sheet for a masculine yet soft baby look (if that makes sense).

My tips:  
  • pierce the oval shape from the back side of the paper to create bolder holes.
  • make a couple of your background images come to life by stamping them in a different color, cutting them out, then raising them up with a dimensional.
  • use the same stamp set to create a matching envelope.
  • Crumb cake envelopes are a great alternative to white envelopes for any card.

*Supplies used:
  • cardstock: crumb cake, whisper white, coastal cabana, midnight muse, crisp cantaloupe (for the heart shape)
  • designer series paper(DSP): quatrefancy specialty
  • inks: midnight muse, versamark, coastal cabana
  • stamps: cuddles & kisses, baby bundle (retired)
  • punches: scalloped border, owl (for the heart shape)
  • framelits: oval
  • linen thread
  • essentials paper piercing template & paper piercer 
* you may place an order anytime and at your convenience  simply by clicking on My Online Store to the left.


Tell me, have you been playing with the new SU! products? Leave me a comment below as I love hearing from you. Thank you for stopping by!!! 

Monday, June 3, 2013

New Stampin' UP! catalog Blog hop


 Welcome to my very first Blog Hop! You are about to enter into a very exciting time with us demonstrators while we strutt our stuff with new and fun products in the 2013-2014 Annual Catalog that was released last Friday (May 31st).

 I am the first stop or you may have hopped over from Denise Sullivan's blog, so buckle yourself up for a fun ride!

The new 2013-2015 In-Colors are absolutely beautiful! They remind me of the caribbean (even though I've never been). The colors are smooth and not too bold and not too soft .....just right.

(from left to right): baked brown sugar , coastal cabana, crisp cantaloupe, pistachio pudding, and strawberry slush

I created this project in 2 different colors and I just can't make up my mind which one I like best: pistachio pudding OR strawberry slush.


These little guys have a drawer that you can pull out to reveal your stack of 3"x3" post-it notes as shown on the left. It's also personalized with a monogram using the occasions alphabet stamp set.

The mosaic punch, coordinating embossing folder and stamp set was used in my design. Although I would like to take credit for the overall design of the box, I did, however, downsize the original design that was created by fellow demonstrator, Connie Babbert.You can view her "desktop calendar box" HERE.

Now you must be wondering about dimensions and supplies, right?! I just so happen to create a pdf tutorial for you to make your own "desktop post-it note easel" (click below).

Post-It note easel tutorial (pdf)

Hope you enjoyed taking a tour of my project and don't forget your souvenir! You are also most welcome to make comments below our posts and let us know what you think. Thanks for stopping by!

Your next blog-stop is with the lovely and talented Caren Curtis: #2 on our blog hop!
Click on the links below:

1) Jessica Lewis - www.scrapsprinklecrop.blogspot.com  (YOU ARE HERE)
2) Caren Curtis - http://creatingwithcaren.blogspot.com
3) Cali Bradford - http://calissimplystampinblog.blogspot.com
4) Sami Brown - http://www.samisstampinspot.blogspot.com
5) Denise Sullivan - http://www.gostampit.com


Friday, May 31, 2013

Stampin' UP! 2013-2014 Annual Catalog is here!!!

I'm super, super, super excited about today because the 2013-2014 Annual Catalog is now available for everyone who wants get their hands on it!!! 

I believe this catalog is the best one yet! It's filled with luscious colors, sleek designs, beautiful projects, and much much more!


 To view the catalog and stampin' supplies used, go to the Stampin' UP! Catalogs tab at the top left of this page.

BE IN THE KNOW:

  • Orders for new products in the catalog can be placed starting TODAY (5/31) at 12PM Mountain Time.   
  • Join me for my OPEN HOUSE today at my place to start experiencing the fun with some of our new products! Click HERE to see details.
  • Pay special attention to the GRAB YOUR GREETINGS SALE (starting today)!  click the icon to the right to view the flyer.
  • Products from the Spring Catalog may still be purchased thru today (5/31).
  • Retiring stamps and accessories will be available for purchase through June 3. 


Have questions?? Use my quick e-mail link on the left side of this page to send me an email.


Thursday, May 23, 2013

Stampin' UP graduation cards

I'm really not understanding how in the world are we already going into the month of June? I'm sure lots of you are feeling this way, but luckily, for teachers and kiddos, school will be out in no time. Parents are a different story ...he he he.

With school coming to a close for this school year, I have two dear people (Nathan's birthparents) who will be graduating from high school in June. What better way to congratulate them than with a gift card holder?!

I used the same template that my friend and fellow demo, Sami Brown, shared on her blog. Thank you, Sami!
This became a perfect layout to place my personalized award-ribbon using the school colors: silver and blue.


My Tips:
  •  to create the starburst for the card on the right, use the 1 3/4" scalloped circle punch to punch the shape out then offset the scallops and punch again.
  • like Sami recommended on her blog, pop up a small stamped piece with a dimensional to hold the top flap in place. In my case it was the hand on the card to the right and the small design piece on the card to the left.
 
cards with the top flap open


cards open all the way
 My Tips:
  •  the ticket duo punch is perfect for (some) of the occasions alphabet stamp set as shown in the card to the right.
  • a thin line of tombo glue on 3 edges of the 2" x 4" piece of cardstock is strong enough to hold a gift card.

Supplies used:
  • cardstock: whisper white, midnight muse, basic grey, silver glimmer paper
  • inks: basic gray, midnight muse  
  • stamps: morning post alphabet, occasions alphabet, beyond plaid*, cuddles & kisses*, mosaic madness**
  • punches: 2 1/2" circle, 1 3/4" circle, 1 3/4" scallop circle, 2 3/8" scallop circle, ticket duo, mosaic**
  •  embellishments: rhinestones
  • ribbon: midnight muse stitched ribbon
  • tools: stamp-a-majig, paper piercer and template     
  * denotes products from the 2013 spring catalog
** denotes products from the upcoming 2013-2014 catalog


You can order any Stampin' UP! products at my online store. Thanks so much for stopping by!