My stamp club ladies got together this past Saturday to create some projects using the yummy products from the new 2013-2014 Stampin' UP! catalog !
This month we created a unique and eclectic Father's Day card using the Show & Tell photopolymer stamp sets. I really like the color combinations for a masculine card.
My tips:
- create long arrows by inking & stamping half of the image first, then the other half next to it.
- SU's online class-Seeing the Possibilities (item 134532)-provides all the
basics you need to make the most of their newest photopolymer stamp
offerings
Supplies used:
- cardstock: basic gray, smoky slate, bermuda bay, chocolate chip, whisper white
- inks: chocolate chip, basic grey, bermuda bay, white kraft ink
- stamp set: show & tell 1,2 ; designer typeset
- embellishments: neutrals candy dots
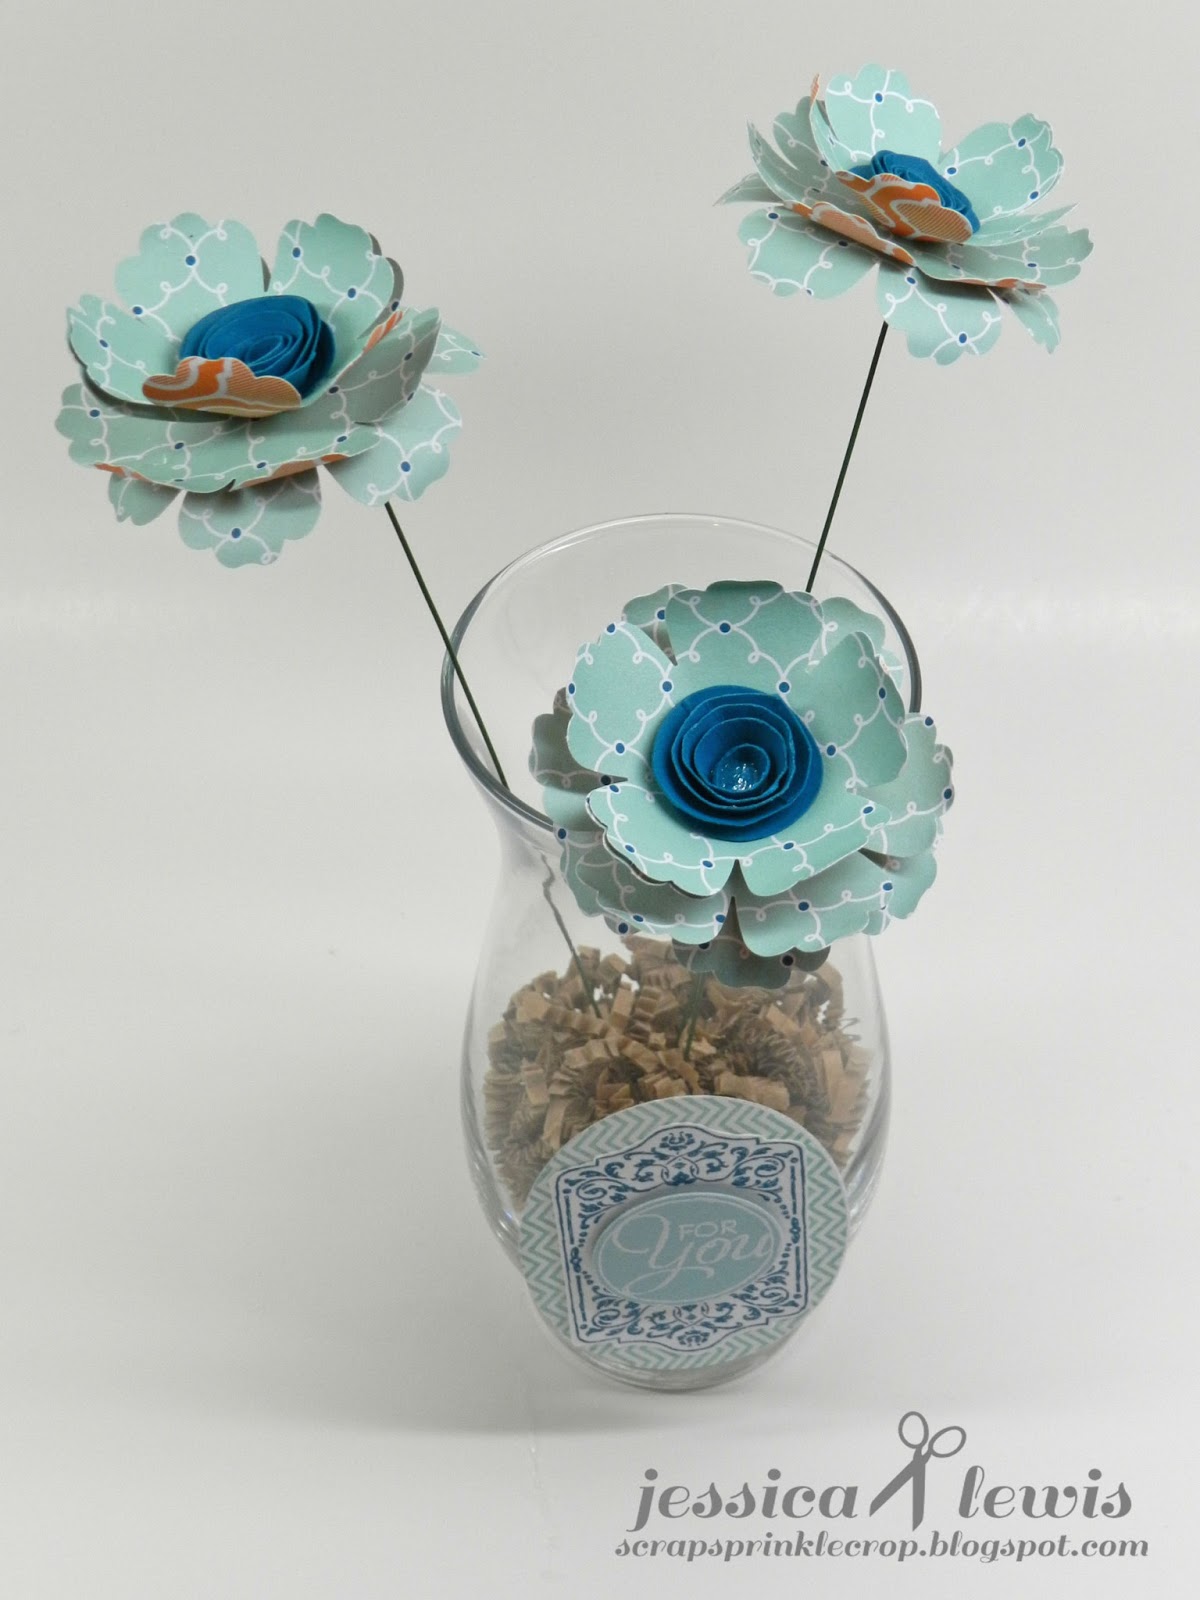
Our next project is not necessarily a Father's day gift but a simple home decor item that can strike a good conversation in anyone's home!
My tips:
- punch out 3 flowers. curl two of the flower's petals upward then 1 of them downward.
- the top flower is made by cutting a slit between two of the petals toward the center of the flower. Then overlap one petal over the other to create a raised flower (you now have 5 petals instead of 6)
- create the rose shape in the middle of the top flower by punching out a 1 3/4" circle and cutting it into a swirl shape; curl from the tip with a skewer to create the rose.
- works best if you use a low-heat glue gun.
- cut 3 different lengths of floral wire to offset your flowers.
Supplies used:
- cardstock: island indigo, whisper white
- inks: pool party, island indigo, versamark
- designer series paper(DSP): quatrefancy
- stamp set: oh,hello; chalk talk
- white embossing powder & heat gun
- other: floral wire, 6 1/2" tall vase (dollar store), filler paper
Hope you enjoyed today's post! I would love to hear feedback from you, so tell me what you think!
Until next time!....
It's a beautiful and cool morning today! The sun is finally been out after all the rain and cloud cover we've had.
I just want to do a quick post on a recent card I made for a co-worker of mine that will be soon expecting her first baby boy. Pure sweetness!
Boy, are you up for an exciting year of new 2013-2014 Stampin' UP! products! From the new colors to stamp sets to beautiful designer paper, you will LOVE it all!
I fell in love with the quatrefoil design printed on the window sheet that comes in the Quatrefancy specialty paper. You can use it by itself or you can place any color paper you desire behind it to fit your project colors.
I used coastal cabana as my color behind the window sheet for a masculine yet soft baby look (if that makes sense).
My tips:
- pierce the oval shape from the back side of the paper to create bolder holes.
- make a couple of your background images come to life by stamping them in a different color, cutting them out, then raising them up with a dimensional.
- use the same stamp set to create a matching envelope.
- Crumb cake envelopes are a great alternative to white envelopes for any card.
*Supplies used:
- cardstock: crumb cake, whisper white, coastal cabana, midnight muse, crisp cantaloupe (for the heart shape)
- designer series paper(DSP): quatrefancy specialty
- inks: midnight muse, versamark, coastal cabana
- stamps: cuddles & kisses, baby bundle (retired)
- punches: scalloped border, owl (for the heart shape)
- framelits: oval
- linen thread
- essentials paper piercing template & paper piercer
* you may place an order anytime and at your convenience simply by clicking on My Online Store to the left.
Tell me, have you been playing with the new SU! products? Leave me a comment below as I love hearing from you. Thank you for stopping by!!!