Wednesday, November 20, 2013

Stampin' UP! Holiday Sale

https://drive.google.com/file/d/0B6365DfBbK2sby1YWVF1d3VoZGs/edit?usp=sharing

It's time for online holiday shopping! During these 12 days only, you can get incredible discounts -up to 50 percent- on some of your favorite products! This is the perfect time for you to stock up on some of your favorite items or for a new interested stamper to give Stampin' Up! a try. 

Also, make sure you don't miss out on SU!'s 24-hour-only doorbusters happening on the first day of the sale-30 percent off the Stampin' Trimmer, Simply Scored Diagonal Plate, and Many Marvelous Markers! The 24-hour sales period on these three products ends at 11:50 PM (MT), November 20.

ACCESS THE HOLIDAY SALE FLYER ON THE RIGHT SIDE OF THIS PAGE !!! 

ACCESS MY ONLINE STORE ON THE LEFT SIDE OF THIS PAGE!!!


Sunday, November 17, 2013

Turkey Punch Art

I'm starting to feel all the Holiday spirit around me with all the talk and shopping for Thanksgiving and Christmas. These two are TOO close to occur but instead of running from it (which I lean to), I'm just going to have to embrace it.

 Yesterday, we had a wonderful time with a group of kiddos that we spend time with once a month as our church mission. This time we put together a Thanksgiving frame.
 My TIPS:
  • The inside of the store-bought frame was replaced with chalkboard MDF (which I got at Home Depot).  
  • This cute little Punch art Turkey was cased from Alexandra Bleicher & was slightly modified. You can view and download my tutorial under my Tutorials and Cheat Sheets tab.

Supplies used:
  • turkey punch art -> view tutorial
  • 5" x 7" picture frame (Dollar store) 
  • chalkboard MDF (Home Depot; comes in a sheet of 2' x 4')
  •  chalk 
  • glue gun (to glue turkey to frame)

It's amazing how they all created the same project but all look so different! Each turkey seemed to fit the child's personality. It was so great to watch them put their project together and have fun doing it!


Thank you for taking the time to view today's post. I would LOVE to hear your comments and feedback! Until next time...
 

Sunday, November 3, 2013

Tags Blog HOP


 Welcome to our November Blog Hop! This time around, we are featuring gift tags just in time for the gift giving season!!!

I'm stop #6 of 6 and I hope you've been inspired by these talented ladies to create your own gift tags.
Please be sure to let us know how we did by commenting below our blog post. 

As for my set of tags, I went for a Christmas theme with three different layouts and color schemes.
 
 The two common items for these three tags are the: 1) Christmas tagables photopolymer stamp set and 2)large chalk talk framelit


"December 25th" tag:

Supplies Used:
  • cardstock: old olive, cherry cobbler, whisper white, silver glimmer paper
  • ink: cherry cobbler marker, versamark
  • stamp set: christmas tagables photopolymer stamp set
  • ribbon: baked brown sugar ruffle stretched trim
  • punches: 1 1/4" circle, hexagon (for flagged ends)
  • white embossing powder
  • paper piercing template 
  • paper piercer and mat 
  • delicate doilies sizzlit (medium size)
  • large chalk talk framelit


"HO HO HO" tag:
 
 
Supplies Used:
  • cardstock: island indigo, smokey slate, whisper white
  • dsp: winter frost DSP paper pack
  • ink: island indigo
  • stamp set: christmas tagables photopolymer stamp set
  • ribbon: island indigo bakers twine
  • embellisments: neutral designer buttons
  • large chalk talk framelit


"For You" tag:
  
Supplies Used:
  • cardstock: baked brown sugar, whisper white, basic black, crisp cantaloupe, gumball green, silver glimmer paper
  • dsp: birthday basics
  • ink: basic black, versamark, soft suede (for sponging edges)
  • stamp set: christmas tagables photopolymer stamp set
  • punches: bird builder, owl builder, ornament (retired), scalloped oval, itty bitty shapes, heart
  • large chalk talk framelit
  • white embossing powder
** the punch art for this cutie elf is cased from Diana Gibbs.


Thanks so much for hopping by and would love to hear what you think about our creations!!! 

  1. Ronna Powers - Ronnaspaperplace.blogspot.com 
  2. Caren Curtis - CreatingwithCaren.blogspot.com
  3. Linda Shillingburglindasstamptherapy.wordpress.com
  4. Sami Brown - samisstampinspot.blogspot.com
  5. Cali Medfordcalissimplystampinblog.blogspot.com
  6. Jessica Lewis - scrapsprinklecrop.blogspot.com <--- you are here

Tuesday, October 29, 2013

Folder card


Ever since the envelope punch board came out (my latest favorite tool!), I have seen so many cute "folder" cards and had to give it a whirl myself.

I took the opportunity as it came when I was asked to create a "welcome back" card for a co-worker.

As I usually do, envisioned the design on my paper before I got started. Here are some tips for you on how I started:
  1. Create a sketch by drawing how you want your card to fold/open.
  2. choose your card front layout: there are a gazillion card sketches to choose from (i.e. pinterest)
  3. Choose your colors. I usually choose 3-4 colors.
  4. for each layer of your design, describe what you want to do with it (i.e. color spritz the doilie) 


Notice how this is just a ROUGH sketch because once you get started on your actual final product, things change. So, be flexible when you create!

I created this card with the retired ribbon slide (2012 Holiday catalog) and I just wasn't sure on this being the final creation.


I fiddled with different ribbons and papers on the ribbon slide for a while then finally decided that the ribbon slide wasn't going to work. So, I chose a vintage faceted button.
Ahhh, much better, no?!

card size is 5.5" x 4.25"

It made sense that the ribbon slide was too modern for the Doillie I have in the background.

The tabbed insert makes the card look like a real folder.

 
I made sure to give my co-workers signing the card enough space to write their message.

Supplies used:
  • cardstock: crumb cake, calypso coral, very vanilla
  • DSP (designer series paper): epic day this and that  
  • inks: soft suede, black
  • stamps: occasions alphabet
  • punches: word window, dotted scallop ribbon border (cut strip in 1/2)
  • pretty print embossing folder
  • paper doillie
  • vintage faceted button
  • white twine
  • pool party ruffled ribbon (retired)
  • envelope punch board

I would love to hear what you think about my latest creation by leaving me a comment below! 
Until next time....

Tuesday, October 22, 2013

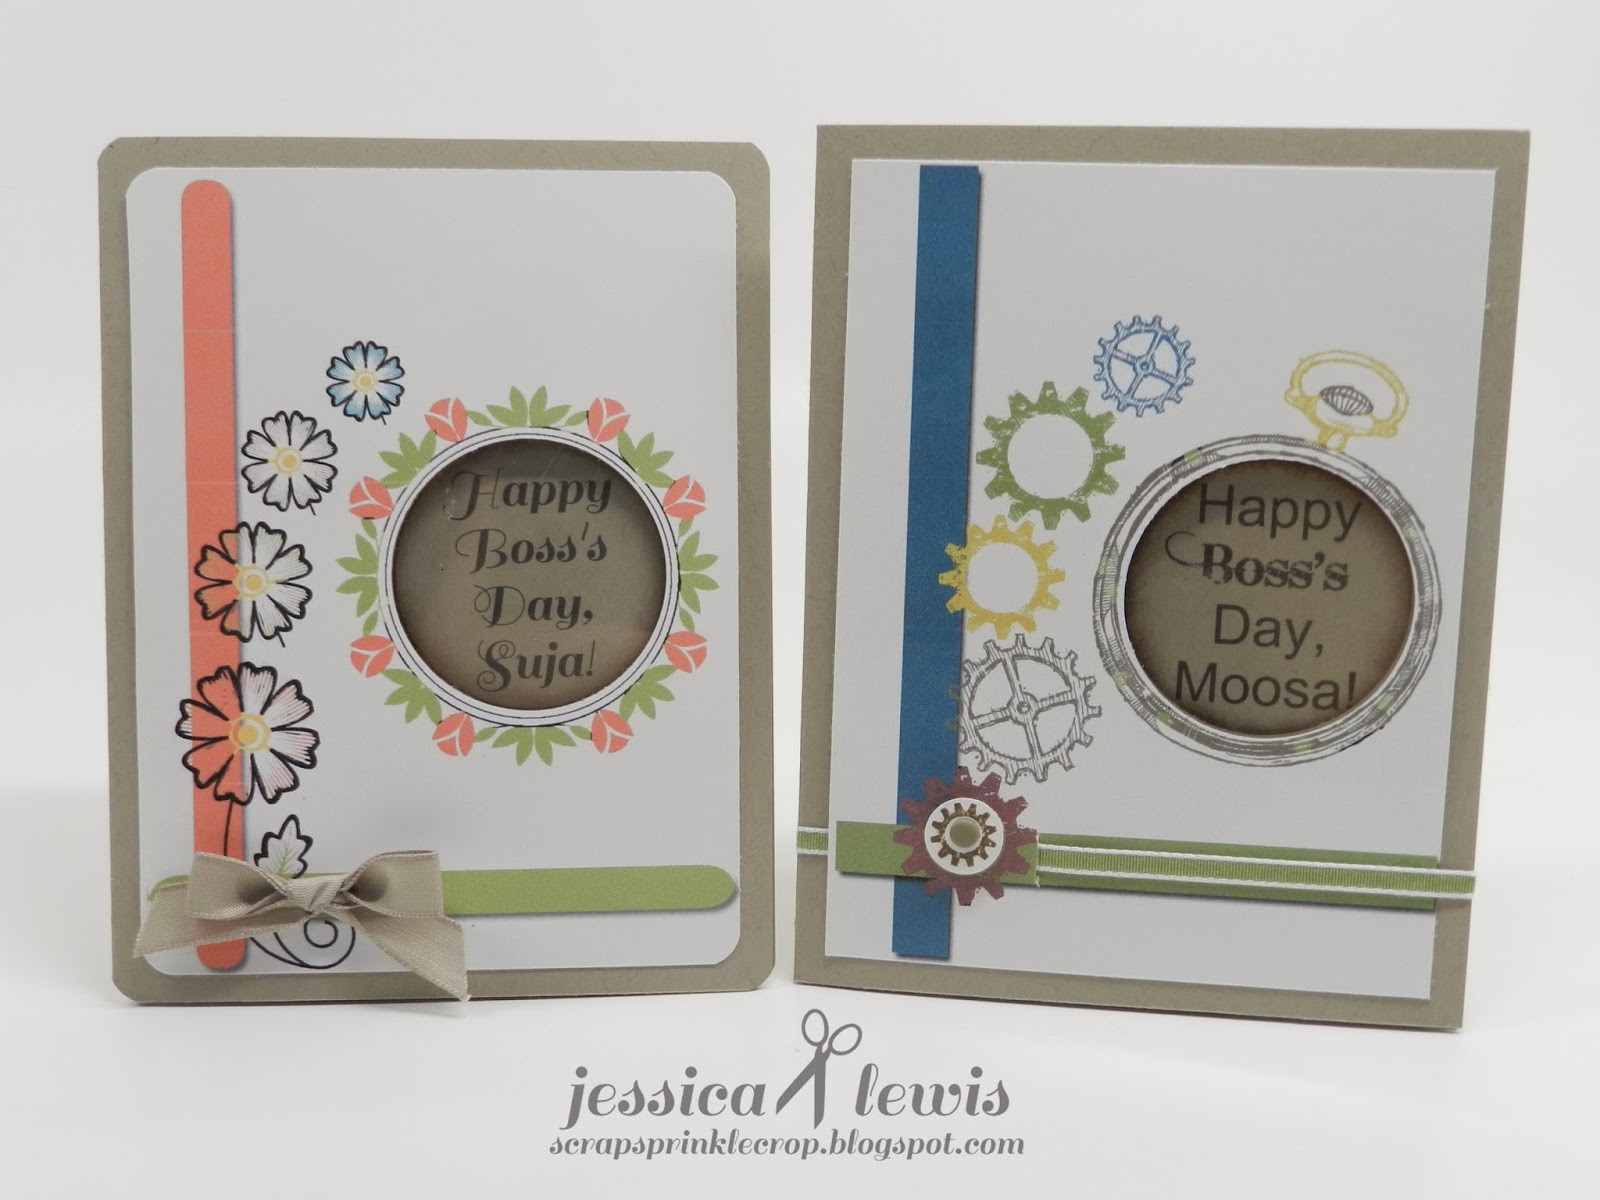
Hybrid Boss's Day cards

This week has been a super busy week for me in my work and personal life. Of course, I had been requested to make 10 Bosses' Day cards for work just to add to the mix!

It's times like these when I say, "Thank goodness for My Digital Studio!" because it helped me make 10 (1 of which is feminine) quick card fronts then I embellished them with some 3-D elements ( in other words: hybrid cards)


Thanks to my "card sketches" pinterest board, I found a masculine layout that I could use for these cards. This sketch was created by Anna-Carin. Simple and masculine.
 My Tips:
  • use the Surprise Me feature under the Combos tab of the Choose Color icon in MDS to select your color combinations. In my case I used: soft suede, island indigo, old olive, and baja breeze.


  •  I used the "clockworks" digital stamp brush set then resized and colored each gear to match my color palette.

  •  I resized the watch so that the middle of it would be 1.75"....just the right size for me to use my 1.75" circle punch.

  • I added a 2" square piece of window sheet with glue dots between the card front and the card base before adhering. The window sheet resembles the face of the watch. 
  • I stamped an extra gear using the clear mount stamp set to make the lower left gear "pop". Then I added a candy dot in the middle.
  • for a feminine design, I used a different color combo (calypso coral, pear pizzaz, bermuda bay, crumb cake) and substituted the gears for some flowers.

Supplies Used (masculine card):
  • cardstock: crumb cake, whisper white
  • ink: soft suede, old olive
  • punches: 1 3/4" circle
  • My Digital Studio: clockworks stamp brush set 
  • embellishments: old olive 1/8" taffeta ribbon, soft suede candy dots. 

 Supplies Used (femenine card): 
  •  cardstock: crumb cake, whisper white
  • punches: 1 3/4" circle
  • My Digital Studio: together forever stamp brush set 
  • embellishments: crumb cake 3/8" taffeta ribbon

Sunday, October 13, 2013

Halloween treats

It was a fun-filled Saturday morning with all the kiddos and adults that attended my special workshop. This was actually my first time hosting kiddos and must say that it went better than I expected. I'm glad I thought out the process of what I was going to do ahead of time. Looking ahead paid off!

Everyone said they enjoyed their time and projects they made. I knew these projects had to be easy, quick, and cute so I figured some punch art would be fun for them to put together. A BIG plus is: you use minimum supplies!

Frankenstein trick or treat bag and bat candy corn bag

Now that I think of it, I should have shown you all the adorable projects these kids made. They're all so different and fun in their own way. These kids have some imagination!!!

MY TIPS:
  • I used MDS (my digital studio) to create the "Trick or Treat" and "Boo" stamp images by using my paintbrush to randomly color orange on the words.
  • Frankenstein's face and hair was cut out using the Top Note bigz die
  • Frank's bolts on the side of his face were made using the smallest ticket from the ticket duo builder punch 
  • i created the bat wings using the butterfly punch and the itty bitty circle punch  by snipping the butterfly in halfway lengthwise then using the bitty circle to create the arch in each wing.

 SUPPLIES USED (Frankenstein bag):
  • cardstock: pumpkin pie, basic black, whisper white, gumball green, basic gray
  • inks: basic black, craft white, gumball green
  • punches: 1 3/4" circle, 1 1/4" circle, small oval, ticket duo builder
  • top note bigz die
  • witches' brew designer washi tape
  • (non-SU!): medium craft bag (I got mine from Hobby Lobby)

SUPPLIES USED (bat candy corn bag):
  • kit: pumpkin pie goodie gear simply created kit
  • cardstock: basic black
  • inks: white gel pen
  • punches: owl builder, butterfly, itty bitty circle
  • black stampin' glitter
  • (non-SU!): candy corn, googly eyes

 Thanks for stopping by! Until next time....
 

Saturday, October 5, 2013

World Card Making day

Today is World Card Making Day and I'm super excited that I got to get up super early (before my baby wakes up) to sit at my stamp haven and get creative! 

Stampin' UP! is having a World Card Making Day contest and I went ahead and submitted my creation to them. Who knows, maybe I'll be one of the 100 randomly picked winners?! Learn more at http://www.stampinup.com/home

This card is masculine and monochromatic. Hope you enjoy it!

Supplies Used:
  • cardstock: gumball green, pear pizzaz, summer starfruit, very vanilla
  • inks: versamark, gumball green
  • stamp set: six-sided sampler
  • embellishments: hardware clip essentials
  • ribbon: linen thread, chevron pear pizzaz   
  • woodgrain embossing folder

Go ahead, create a card! 
Then show Stampin' UP! what you made. 
Happy World Card Making Day!!!


Sunday, September 22, 2013

5th year anniversary card

My husband and I just celebrated our 5th year wedding anniversary and, naturally, I made a card for my dear husband.

In case you may not know, the 5th year wedding anniversary gift is wood which signifies strength, solidity, and warmth. I didn't gift my husband an actual piece of wood but I created this card to resemble wood.


 I used the card sketch below from June's Mojo Monday.

MOJO296
 Supplies Used:
  • cardstock: early espresso, whisper white, bermuda bay, pistachio pudding, crumb cake
  •  stamps: memorable moments
  • inks: early espresso, crumb cake, bermuda bay
  • thanksgiving tablescape kit (background paper)
  • punches: 2 1/2" circle, 1 3/4" circle, heart
  • woodgrain embossing folder
  • paper piercing mat & paper piercer
  •  neutrals candy dots

View & shop for your Stampin' UP! supplies at my online store located on the left of this page. 

Until next time.... 

Sunday, September 15, 2013

His & Hers birthday cards

September stamp club was super fun! I sure hope my gals enjoyed their projects as we put together a His and Hers birthday cards! They look like they're enjoying themselves, don't they??!!

 My card design was "cased" from one of this year's convention presentations. I knew I had to make one of these as soon as I could. Here's what Shelli featured at convention.


I decided to create a His & Hers birthday cards considering that I pretty much have a birthday every day this month plus there's always a birthday card to be made for someone, right?!

The awesome part about these cards is that when you open the top flap, the sentiment comes right out with it! Super COOL!

My TIPS:
  • cut your base cardstock to 4 1/4"x11" then score at 1 1/2"
     and 7".
  • use sticky strip on the edges of your card base to create the pocket as shown below.
  •   create the inside piece by cutting a 3 1/2"x3 1/4" piece of cardstock and scoring it to 1/4". 
  •  Adhere sticky strip above the score line.
  • Place the 3 1/2"x 3 1/4" piece of CS inside the pocket then fold top flap over the CS piece to adhere.

Supplies Used for "HER":
  • cardstock: crumb cake, crisp cantaloupe, summer starfruit, very vanilla, silver glimmer paper
  • DSP: birthday basics
  • inks: crisp cantaloupe
  •  stamp set: chalk talk, yippee-skipee!
  • punches: extra large oval, hexagon (to flag the ends), scallop edge border, itty bitty shapes
  • framelits: chalk talk
  •  My digital studio (for the bow)
  • polka dots embossing folder
  • black embossing powder 


 Supplies Used for "HIM": 
  • cardstock: crumb cake, whisper white, bermuda bay, gumball green,  basic gray
  •  inks: basic gray, gumball green, bermuda bay
  •  stamp set: morning post alphabet, memorable moments, dapper dad (retired)
  • punches: 1/2" circle
  • argyle embossing folder


 Thanks so much for stopping by. If you have any questions, feel free to e-mail me by clicking on the link on the left column.
Until next time....

Wednesday, September 11, 2013

Build a banner Blog HOP


Welcome to the Go Stamp It blog hop!
You are sure to love the creativity that this group of ladies bring to the crafting table (if you haven't already)! 
I am stop #5 in the blog hop and sure hope you enjoy what I have to show you.

For some reason, I had crafter's block this week and just couldn't get this banner situation worked out the way I wanted it so I had to resort to a simpler project.

I started off with dip-dye technique that was demonstrated by Stampin' UP's concept artist, Jen C. I was sure my banner was going to come out as beautiful as Jen's (below) but I was wrong.

Created by Stampin' UP! concept Artist, Jen C.


Dip-dye technique using water (tried to fix in the pic on the left, without fixing on the right)

On the first attempt I just couldn't figure out why my banners turned into an ugly brown and crinkled once it dried. After quite a while, I figured out that I used water instead of alcohol as my medium. DUH!!!
After figuring out that I needed to use alcohol, I created another set of banners using the dip-dye technique. Needless to say, I MUST be using the wrong ink because the same thing occurred......it dried to a light brown color. I tried covering it up by sponging some of the ink but it ended up looking worse. UGH!


 I kind of gave up and just said "heck with it!", but the thought of the ugly brown lingered in my head. Plus, I didn't think it was Blog Hop - worthy.

So once again, I'm at my crafting table coming up with a different option.

I wanted to create a fun and colorful banner for my son, Nathan's room. His room is Goofy (Disney) themed. So, I decided to resort to simply using the ink pads and markers.


Notice how  the outside edges of the banner are colored? I used the striped template from the build-a-banner kit as my guide.I then used the fine tip of  my marker to outline the circles and letters.

Finished project. Canvas frame painted by my dear friend Emily; Banner created by me.

I'm pretty happy with the turn-out of these banners but somewhat disappointed with the dip-dye fail =o(

Supplies used:
  • buil-a-banner kit (pg 31 of Holiday catalog)
  • markers: pear pizzaz, tangerine tango, chocolate chip, pacific point.
  • inks: pear pizzaz, tangerine tango, chocolate chip, pacific point.
  • sponge daubers

As I close, I do ask for your help and comment below on what I should try to make this dip-dye technique a success. Any suggestions???

Thanks for reading my post!! Up next, stop #6 with the lovely, talented, and wonderful DENISE SULLIVAN.
  1. Linda Shillingburghttp://lindasstamptherapy.wordpress.com/
  2. Sami Brown - http://samisstampinspot.blogspot.com
  3. Caren Curtis - http://creatingwithcaren.blogspot.com
  4. Ronna Powers - http://ronnaspaperplace.blogspot.com
  5. Jessica Lewis - http://scrapsprinklecrop.blogspot.com     <--- YOU ARE HERE
  6. Denise Sulllivan - http://gostampit.blogspot.com