Hello crafty friends!
It's been quite a busy couple of weeks trying to get ready for my New Catalog Launch Party and now it's all history! Isn't it sad that you take SO much time to prepare for a special event and then it's all said and done in a matter of hours?!
The party was super fun and although I didn't have a large crowd of stampers, the 4 of us still enjoyed each other's company and had a blast stamping and talking about the new products in the Stampin' UP! annual catalog!
We have 1 more lady missing in this picture.
Below are a few pics of my setup.
 | Welcome Table
|
|
 | Product Display Table
|
|
 | Make N Take Table
|
|
 | Door Prize Area
|
|
My guests received a simple stuffed envelope as a gift for attending. I included a handmade card from me (CASED the card from page 56), a chocolate, 2 hard candies and a Stampin' UP! pencil.
Once my guests settled into their seats at the Make-n-take table, we created a simple card and coordinating "six-pack" chocolate holder. The chocolate holder was CASED from Debbie Henderson and you can view her tutorial here.
These two cute projects were created using the He's The Man Suite from page 78-79 of the Annual catalog, just in time for Father's Day in June.
I did a lot of the prep work for my guests ahead of time, such as the embossing on the piece of Crumb Cake cardstock and cutting out the shapes for the card. For the "six-pack", I assembled the box for them ahead of time. All they had to do was adhere the designer paper onto the box, stamp the sentiment and staple the Soft Suede ribbon.
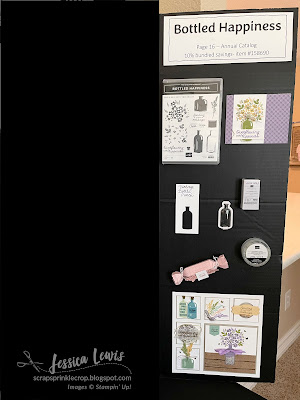
I had lots of products on display at my product display table and feature the following Bundles or Suites:
As a rule of thumb, I chose to create 3 samples of each bundle or suite: a scrapbook page or sampler page, a card (CASED from the annual catalog) and a 3D item.
He's The Man Suite
Hues of Happiness Suite
Sweet Songbirds Bundle
Since there is no designer paper included with this bundle, I chose to use the Design A Daydream - Host Designer Series Paper which can only be ordered using Stampin' Rewards when you have an order that totals to $150 or more.
This time I didn't CASE the card from the catalog and came up with my own design. The adorable little birdhouse was CASED from Jo Dumbleton and you can find her tutorial here.
Waves of Inspiration Bundle
Tea Boutique Suite
Bottled Happiness Bundle
Phew!!! that was plenty of work for me and hope you like all the samples I created for my display boards.
I have a few tips for you as I was putting together my display boards:
- I purchased 2 black tri-fold display boards (48" x 36") from WalMart. This was enough to display 3 suites/bundles for each display board.
- I highly recommend using the 1/2" removable mounting tabs that I purchased on Amazon. They were sticky enough to hold up my samples and products but not so sticky that it would tear things up after I removed them.
- Be sure to lay everything out on your panel before adhering to the display board. Believe me when I tell you this and I'm speaking from experience, LOL!
THANK YOU so much for taking a look today!!! You are very welcome to ask me any questions by submitting a comment below.
Until next time ...


