Tuesday, June 29, 2021

Stampin' Updates plus GIVEAWAY!!!

Hello crafty friends! 

Instead of showing a project this week, I'm going to provide you with some important crafty events coming up soon!

If you would like to receive these crafty updates on a weekly basis, be sure to click on the "Newsletter" icon to the right of this page to sign up!

First up is the: 

Designer Series Paper (DSP) Sale


The DSP Sale is coming this Thursday, July 1st!!!
You can enjoy a 15% discount on select papers from the 2021-2022 Annual Catalog and it’s the perfect opportunity to stock up and save on gorgeous DSP.

Let me know if you’d like take advantage of the DSP sale and I’d be happy to place an order for you OR you can order at my Online Store on Thursday.

Here is the flyer that shows what select DSP is on sale: DSP Flyer


LAST CHANCE PRODUCTS

You have 1 day to get any retiring products from the 2021 Mini Catalog before they're gone for good on June 30th!

There's also 1 day left to get the
Hey Chick and Hey Birthday Chick Bundles because they will be gone as well!

This selection of Last Chance Products are only available while supplies last.


Upcoming Events in August


Just want to give you a heads up on a few upcoming and exciting events to look forward to in August. I will be sure to give you more information as we approach these events!

The July–December 2021 Mini Catalog will be released to all customers on August 3rd (in July for demonstrators) and is your passport to stunning seasonal projects! It contains all the products you’ll need to craft, create, and celebrate during the Fall, Halloween, Christmas, and more.

Also, get ready for another round of Sale-a-Bration coming on August 1st! You will be able to Shop, Host, or Join to earn some of the amazing products contained within the SAB Brochure.


GIVEAWAY!

Why not have a little giveaway with this blog post?!

Please comment below and tell me what DSP (that's on sale) you would say is your favorite ?


and I'll select 1 lucky winner to receive the... 

Painted Texture Embossing Folder


Please have your comments in by 11:59pm (CST) on Thursday, July 1st. I'll announce the winner on Friday, July 2nd at 12pm (CST).


This is all I have for you this week! Be sure to set yourself a reminder to order some of that gorgeous DSP beginning July 1st!!! 
Tuesday, June 22, 2021

Saying "farewell" with Pierced Blooms Dies

 Hello Crafty Friends! 

This week I'm showing you a little project that I worked on to give away as a keep-sake for a co-worker that will be leaving our team. 

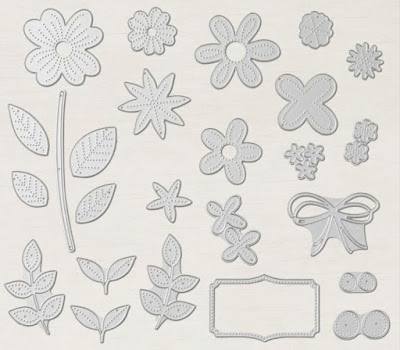
The Pierced Bloom Dies are one of those sets of dies that can be used all by themselves without any stamping necessary and that is exactly what I did for the 3"x3" cards for this project.


It may be hard to tell from the image above that all of the die cuts have a pierced outline. When the 2021 Mini Catalog came out I completely missed this and was shocked when I saw samples of these dies being used.

Even though a lot of the Mini catalog products are retiring, thankfully, the Pierced Blooms dies and the coordinating In Bloom stamp set is in the 2021-2022 Annual Catalog, so you can get this set if you haven't done so already.

I paired some of the new In-Colors with the Gilded Leafing to make a set of 20- 3"x3" cards. These are then stored in the Scalloped Kraft Treat Box as shown below.


Cardmaking Tips:

  • Use Basic White Thick cardstock for the card bases. The finished size is 3"x3", which is a 3" x 6" piece of cardstock scored at 3".
  • Cut a 2 3/4" x 2 3/4" piece of Basic white cardstock and adhere two strips of Tear and Tape Adhesive then place some gold Gilded Leafing using a dry paint brush. As you can see in the image below, it's a little messy but the leafing sticks very well with no problems. I find this process satisfying, LOL.
  • Cut out different pieces of leaves from the Pierced Blooms Dies using Soft Succulent and Evening Evergreen. Cut out pieces of flowers from Pale Papaya and Fresh Freesia cardstock.
  • Arrange and adhere the flowers and leaves onto the Basic White piece of cardstock. Adhere onto the Basic white card base using dimensionals. A few close-up samples below.

  • The box came together rather quickly using the Scalloped Kraft Treat Boxes, a few flowers, leaves, a white stitched circle and some white twine. 

  • The sentiment "Especially for you" is from the Little Treats retired stamp set from the 2020 Holiday catalog. I created the name "Lani" using the retired Make a Difference stamp set from the 2020-2021 Annual Catalog. Both sentiments were gold embossed.

Products List: 
Click on the following link for a full list of the products I used on this project: https://s.tamp.in/pF1AeS 

Please note the following products are retired and not in the product list: 
Stamps - Little Treats, Make a Difference
Dies - Stitched Shapes 


This is all I have for you this week. Let me know if you've played with the Pierced Blooms dies for your projects! I'd love to know what you think about them.

Until next time... 

Saturday, June 12, 2021

A Lemon Zest themed Teacher Gift Basket

 Hello Crafty Friends! 

Well... the end of my boys' school year has arrived and we have officially begun our summer! 

These two cute and energetic kiddos have grown so much in the past year and I'm super thankful for their teachers that went above and beyond to help them and teach them in the midst of a rough past year with all the restrictions due to... you know what. 


In order to express my sincere gratitude to each of their teachers, I put together a little gift basket that is themed around the Lemon Zest Bundle from the 2017-2018 Stampin' UP! Annual Catalog. 

Don't you get super excited when you can pull out an oldie but goodie stamp set like this one to create some projects?!

So, here's the basket I put together. 

This basket is filled with so many goodies so I will give you a summary of what's in it starting from the back and working up to the front.

  •  2 sets of 5 handmade cards to give away - by yours truly 
  •  A gift bag which contains a gift voucher for a 1hour massage - Local Massage parlor
  •  A bottle of "Kitchen Lemon" foaming hand soap - Bath and Body works
  •  A box of Lemon heads - Target
  • A "Limoncello" scented candle - Bath and Body Works
  • A handmade Lemon Zest fun fold card 
  •  A handmade Sugar Lemon Scrub 
  •  A "Sunshine and Lemons" hand sanitizer - Bath and Body Works
  •  A basket gift Tag
  •  The basket itself was purchased from Target and located in the Magnolia line of products (LOVE, LOVE, LOVE...)


While the items that I created are themed around the Lemon Zest bundle, I did use some current product too. Allow me to give you a closer look and explain what I used for each little project below.


THE GIFT BAG WITH VOUCHER


Project Supplies
The supplies described below are current except as noted.
  • Cardstock: Basic White
  • Ink: Daffodil Delight, Granny Apple Green, Memento Black
  • Stamps: Lemon Zest (2017-2018 Annual Catalog) , Picked For You (2018-2019 Annual Catalog)[for sentiment], Biggest Wish
  • Punch: Lemon builder (2017-2018 Annual Catalog)
  • Ribbon: Daffodil Delight 1/4" Organdy Ribbon (2019 Sale-a-bration)
  • Packaging: Chevron Gift Bag (2013-2014 Annual Catalog)
  • Tools: Stamparatus
This little project couldn't get more easier since the only stamping that I did was for the lemon and the "thanks" on the gift bag. As you can see, I was so glad to be able to use some of my oldie but goodie items that I've had in my stash.

THE FUN FOLD CARD


 This card was so much fun and easy to make... no wonder they call it a fun fold! I made this card to be able to fit a wallet size picture of my son and his teacher on one panel and then leave a note in the smaller card. 

This card is technically a smaller card within a card. 

Cardmaking Tips:

  • The finished card size is 4 1/4" x 5 1/2". This is a piece of Daffodil Delight cardstock that measures 4 1/4" x 11" and then scored on the long side at 2 3/4" and 5 1/2". 
  • The smaller card that opens from left to right and adhered to the right side of the card base has a finished size of 3 1/4" x 4 1/2". This is a piece of Daffodil Delight cardstock that measures 3 1/4" x 9" and scored on the long side at 4 1/2". 
  • The sentiment "you made lemonade out of lemons" is not a part of any stamp set so I typed it out in Microsoft Word and printed it onto some Whisper White cardstock. 
  • Use the Pattern Party Host DSP to decorate all the panels on the card. 
  • Finish off the card with some more Daffodil Delight ribbon.
Cardmaking Supplies: 

  • Paper & Cardstock: Basic White, Daffodil Delight, Pattern Party Host DSP
  • Ink: Daffodil Delight, Granny Apple Green, Memento Black
  • Stamps: Lemon Zest (2017-2018 Annual Catalog) , Picked For You (2018-2019 Annual Catalog)
  • Punch: Lemon builder (2017-2018 Annual Catalog), 1 3/4" circle
  • Ribbon: Daffodil Delight 1/4" Organdy Ribbon (2019 Sale-a-bration)
  • Tools: Scoring board, Paper Trimmer


HOMEMADE SUGAR SCRUB


This cute little jar of homemade sugar scrub was very simple to put together and smells Oh, So Good!!!


Tips

  • Use a Mini Jam Jar to fill it with the homemade sugar scrub as shown in the recipe on the top of the jar in the picture above. This recipe came from Lemon Lime Adventures.
  • The recipe was typed out in Microsoft Word and printed onto Basic White cardstock then punched out with the 2" circle punch.
  • The strip of Patter Play DSP measures 1 3/4" x 8" to wrap around and adhere to the jar.
  • The adorable little mini spoon is from Amazon and I simply attached it onto the jar with a rubber band.

Supplies

  • Paper & Cardstock: Basic White, Daffodil Delight, Pattern Party Host DSP
  • Ink: Daffodil Delight, Granny Apple Green, Memento Black
  • Stamps: Lemon Zest (2017-2018 Annual Catalog) , Picked For You (2018-2019 Annual Catalog)
  • Punch: Lemon builder (2017-2018 Annual Catalog), 2" circle, Lovely Labels pick a punch
  • Ribbon: Daffodil Delight 1/4" Organdy Ribbon (2019 Sale-a-bration)
  • Tools: Paper Trimmer
  • Other: Mini wooden spoon - Amazon.com 

The Lemon Hand Sanitizer Holder


This cute little holder came from a template created by Erica Cerwin

I chose to skip stamping and punching for this project and by adding a little strip of Pattern Party DSP and a simple bow, you've got a cute little treat without much hassle.

Supplies

  • Paper & Cardstock: Daffodil Delight, Pattern Party Host DSP
  • Ribbon: Daffodil Delight 1/4" Organdy Ribbon (2019 Sale-a-bration)
  • Tools: Paper Trimmer, Scoring board
  • Other: "Sunshine and Lemons" hand sanitizer - Bath and Body works

This is all I have for you this week! I do hope you enjoyed all that I had to share today. I would love to hear your comments on your thoughts about this gift basket. Leave me your comments below!!!

Until next time!

Wednesday, June 2, 2021

#TGIFC318 - A Cocktail Card using Stampin' Blends

 Hello Crafty Friends! 

Welcome to today's blog post that features this week's TGIF challenge #318 - designer takeover using Stampin' Blends.


My favorite coloring medium is using Stampin' Blends and couldn't wait to get started on this challenge! 

Several stamp sets were used in order to make this peach and strawberry swirl cocktail card. It all looks so delicious to drink and I'm definitely going to be making the real version of this drink this weekend! LOL...


CARDMAKING TIPS

I will be soon posting have posted a video below on how I created the different fruity elements of the card. updated 6/2/21

  • the Basic White background piece of the card measures 3" x 5" and was embossed using the Painted Texture embossing folder. 
  • The sentiment "today's plan: consume cocktails" was stamped with versamark ink onto a piece of Basic Black cardstock then heat embossed. I deconstructed the words by cutting around them then placed them ono the card as shown. 
  • If you don't have the Apple Builder Punch as shown in the video to create the peach slice punch art, try using a 2" circle punch or die.
  • The last little touch for this card front was to use the Artistry Blooms sequins.

  • For the inside of the card, I simply stamped the large peach and blended it similar to the small peaches on the card front (shown in the video). The strawberry and its stem was stamped with Real Red and Garden Green, respectively, then punched out using the strawberry builder punch. 


CARDMAKING SUPPLIES

Click on the following link to view a full list of supplies used for this project except for the Apple Builder punch and the : https://s.tamp.in/Xc3q31


This is all I have for your this week! I sure hope you are inspired to make a sweet cocktail card of your own and if you are, be sure to let me know in the comments below! I'd love to hear from you!!!

Until next time ...