Wednesday, December 23, 2020

"HOME" frame with interchangeable "O"

 Happy Wednesday crafty friends! 

We are only 2 days away from Christmas Day and I want to share with you a HOME décor piece that I put together as Christmas gifts for our family. 

This frame uses quite a few products from the Stampin' UP! 2020 holiday catalog as well as the NEW 2021 Mini Catalog (coming January 5th, 2021)! 

The frame itself I purchased from Walmart in the crafts section and is described as Barn Wood Plank with Twine Hanging Cord. It measures 5.5"H x 12"W.

While the ideal thing to do is to create a piece for each month of the year, I preferred to create 4 interchangeable pieces for each season of the year, knowing I had to create 8 frames.


I used some 5/8" hook and loop circles with a sticky back to make the pieces interchangeable as shown in the image below.


In order to give the recipients a place to hold the other pieces that aren't being used, I made a box with a lid from Kraft paper that is 4"W x 4"L x" 1.5"H. I then closed it up with the lovely 1" Shaded Spruce Argyle Satin Ribbon. This ribbon makes really good bows!

The Wood Plank

  • To create the H, M and E for this frame, I used my Silhouette Cameo machine by cutting out 3 of each letter (Elephant Font) from Very Vanilla Thick Cardstock. This is to ensure that I have sturdy letters that will give dimension to the frame. The H measures 3.5"H x 2.7"W, the M measures 3.5"H x 3"W and the E measures 3.5"H x 2.3"W.
  • I glued 2 of the same letter together with Tombo Glue then set aside to dry. 
  • Using a T-ruler, I glued the "H" 1/4" from the right edge and the "E" from the left edge using Tombo glue, onto the wood plank. I placed dimensionals on top of these letters then adhered the 2 letters that I adhered together previously, on top.
  • Lastly, I adhered one sticky back of the fuzzy hook and loop circle in the center of the blank space between the H and the M.

The Four "O" Pieces
Here's a close-up of the "O" pieces that I made and packaged them up in a Kraft box as storage while you wait for the next one to be used.


The Poinsettia Piece (winter)


This lovely Poinsettia was made using the following products: https://s.tamp.in/lHG4b3


The Swirly Piece (Fall)


The most time consuming part about this fall piece was to separate the word "grateful" from the rest of the sentiment from the Beautiful Autumn Stamp set. I used my Early Espresso Stampin' Write Marker to color the word "grateful" and stamp it onto Very Vanilla Cardstock. I then lightly traced around the word with a pencil then cut it out with my scissors.


The Dandelion Piece (Spring)


  • This cute piece was inspired by a card featured in the new 2021 Mini catalog made from the Dandy Garden Suite (pg. 24). 
  • The "welcome" word is from the Beautifully Braided stamp set that is now retired but I'm sure you can find another stamp set to substitute it.
  • The "Spring" word is put together from the Make a Difference Stamp Set.
  • Below is the list of products using to make this piece, MINUS the new products from the 2021 Mini Catalog: https://s.tamp.in/-uuH1i


The Ice Cream Piece (Summer)


  • Most of the products used to make this piece is from the new Ice Cream Corner Suite of the 2021 Mini catalog. 
  • Below is the list of products using to make this piece, MINUS the new products from the 2021 Mini Catalog: https://s.tamp.in/-3FapY


This is all I have for you today and hope you have been inspired to make some décor pieces of your own! 

Until next time... 


Saturday, December 5, 2020

Super Mario Punch Art for Birthday Card

 HAPPY SATURDAY! Welcome back to my new blog post that will feature some punch art that is not Christmas related.... ha ha ha. 

I'm taking a break from Christmas projects just for this weekend so I can focus on my son's 8th birthday! He's all about video games like Minecraft and Super Mario. I must mention that this is the first year he's requested me to make him a card. I GLADLY obliged!!!

This card was inspired by a card I found on Pinterest, made by Melanie Makes, which you can find here. Below is the image of her card. I love the layout of the card along with how she made a starburst in the background so that Mario's face is the focus.


Below is my version of the Mario card. 


I made a "pipe" for the inside of the card from Garden Green Cardstock so that it would hold a prize inside. I love this unique money pocket! I cut out one rectangle to 2" x 2 1/4" and another to 3/4" x 2 1/4". I popped these pieces up with mini dimensionals along the bottom and sides, making sure to leave room for the $20 bill.

I had to come up with my own ideas of doing the punch art and put together a little tutorial of the punches I used for each piece which looks similar to Melanie's punch art with some slight differences.


You may access the *.jpg version of the tutorial in the "Tutorials & Cheat Sheets" tab towards the top of this blog page. 

Allow me to share some TIPS about the process of putting this little guy together...

  • Not all the punches I used are available in the current catalog and therefore are retired. If you don't have a certain punch, see what else you could use that has a similar shape for what you're needing. 
  • I highly recommend using grid paper to help you align and measure your pieces for accuracy.
  • I found that using Tombo glue is the best adhesive for adhering your pieces because it give you a chance to move things around until you get it where you want it.
  • Begin by taking a 3" square piece of Very Vanilla Cardstock and use the Ivory Stampin' Blend Marker and color it, let dry. Then punch out Mario's face, ears, and nose.
  •  Punch out the 1 3/8" scalloped circle from Basic Black Cardstock then use a 1" circle punch to punch out the sideburns. I measured the size of the sideburns by counting 5 scallops. For the mustache, I counted 9 or 10 scallops and cut straight across using my scissors.
  • Put together Mario's face first by adhering the nose with a mini-dimensional in the center of his face. Adhere the sideburns slightly above his ears.
  • Use post-it notes to help you punch out a sliver of the hat rim and eyebrows. 
  • For Mario's hat, I used my grid paper to mark 4 points as shown below so that I could cut along the solid line for the shape of the hat, making sure to round the corners.

  • Mario's eyebrows were a little tricky for me. I made 4 of these Mario's and they all turned out differently. You could trim them until you like their shape and thickness.
  • For Mario's tongue, I placed a post-it note towards the top half of the heart punch out and then used the watermelon punch to punch out the tongue.
  • After you complete Mario's face, adhere his ears behind it, then adhere to the hat. 
  • The rim of the hat is the last thing I adhered to Mario's forehead using mini-dimensionals.

Below is a list of SUPPLIES that I used for the front and inside of the card. These items are current Stampin' UP! products except for those noted with an * :
  • STAMP SETS
    • So Many Stars (2019 Holiday Catalog) *
    • BYOB (2015-2016 Annual Catalog) *
    • Poppin Birthday (March 2019 Paper Pumpkin) *
  • DIES
    • Stitched Stars (2019 Holiday Catalog) *
    • Up & Away (2017 Mini Catalog) *
    • Sunburst (2016 Mini Catalog) *
  • PAPER/CARDSTOCK
    • Gingham Gala 6"x6" DSP - Balmy Blue (2019 Mini Catalog) *
    • Balmy Blue cardstock
    • Granny Apple Green cardstock 
    • Whisper White Cardstock
    • Daffodil Delight Cardstock
    • Real Red Cardstock
    • Basic Black Cardstock
    • Very Vanilla Cardstock 
    • Garden Green Cardstock
  • INKS
    • Real Red
    • Granny Apple Green 
  • MARKERS
    • Real Red Stampin' Marker
    • Ivory Stampin' Blend Marker
  • RIBBON: 
    • Playful Pets Trim Combo Pack 
  • PUNCHES:
    • 1/2" circle (2019-2020 Annual catalog) *
    • 1" circle (2019-2020 Annual catalog) *
    • 2" circle 
    • 2 1/4" circle 
    • Owl Punch (2010-2011 Annual catalog) *
    • Itty Bitty Fruit Punch Pack - watermelon (2018 Mini catalog) *
    • Itty Bitty Accents Punch Pack - heart (2014-2015 Annual Catalog) *
    • 1 3/8" scallop circle (2018 Mini Catalog) *
  • MISC. 
    • White Gel Pen (non-Stampin' UP!)

This is all I have for today's post. I sure hope you are able to put together some punch art cards and although it can get tedious, have some fun making art!!!

Until next time ... 

Tuesday, November 24, 2020

Merry & Bright Online Extravaganza

 WELCOME to today's blogpost! 

Today I want to share with you the Merry and Bright Online Extravaganza


Are you just about ready to start your Christmas countdown? The big day is only weeks away, which means just like me, you're starting to think about your holiday papercrafting plans. Perhaps you’d like to make an advent calendar, create some handmade décor, or prep some scrapbook pages. The possibilities are truly endless! 

Since the busiest shopping season is going on now, this is the perfect time for the Merry & Bright Online Extravaganza, with 10% off select annual catalog items. I like to think of this as FREE SHIPPING. Who wouldn't want free shipping, right?!

Not all items in the 2020-2021 Annual Catalog are included in this discount offer. Click HERE to see the exclusions list.

This offer is ONLY available today until 11:50pm (MT). 


SCRAP SPRINKLE CROP OFFER

When you place an order with me of $50 or more and use host code EA72AJ4J,  you will also receive a FREE adhesive of your choice as shown in the flyer below PLUS a pdf tutorial using the Quite Curvy Bundle and the Curvy Christmas stamp set. 

The pdf tutorial includes step-by-step instructions on how to create 4 Christmas Cards a gift box and a gift card holder.   


Please remember that in order to earn any of the items shown in the flyer above, you must use the host code EA72AJ4J. This is only a promotion that I am offering as a demonstrator and not included in the Online Extravaganza Offer for 10% off products by Stampin' UP!.

Begin shopping at my Online Store for those 10% off items and if you order $50 or more, make sure to use that host code to get FREE adhesive along with a FREE PDF tutorial for Curvy Christmas Projects, just in time for Christmas!

Please don't hesitate to ask any questions by commenting below or e-mailing me. Until next time... 


Saturday, November 7, 2020

Making an intentional Advent Calendar with the Christmas Countdown Kit

 Hello, Hello!!!

In today's blog post I want to bring attention to the beautiful Christmas Countdown Project Kit from page 3 of the Stampin' UP! 2020 Holiday catalog.


This kit is an all-inclusive kit, meaning that you have everything you need to create this project. 

As we approach the month of December and the Christmas season, I wanted to use this kit for the purpose of being intentional with my family during the advent season. As believers in God's son, Jesus, who came and was raised from the dead for our sake, we want to pass along the true meaning of Christmas with our children and help them remember that our only hope is in Jesus Christ. 

I put my kit together similar to Ronda Wade's instructions for this kit.


Although this project kit is all-inclusive, I did add a couple of sentiments using the For Unto Us stamp set and the Itty Bitty Christmas stamp set using some Early Espresso Ink. You can see those sentiments on boxes 4, 11, 13, 15, 25. Notice how I added the Gold Gilded gems too for all that shine! These pictures really don't do it justice! Much better in person!

This project came together so quickly! It looks complicated but trust me, it really is not. I'm so thankful for kits like these where are the work is done for you! 


After putting the kit together, I cut up the paper strips of Bible scriptures that Ronda Wade provided in her free series offer and included them into each box. 

I also wanted to include some advent activities for us to do together as a family that was intentional on serving others or that was family-oriented that we could do each day together. Below is an example of what I included in each little box.


For the advent activities, I did a quick search on Pinterest and found this set of Advent calendar activities that can be downloaded on Etsy.


This is all I have for you today! I do hope you enjoy today's post. If you are wanting to do something similar using the Christmas Countdown Project Kit, you still have time before December comes to put it together. Place your order for the kit from your local demonstrator. If you don't have one, feel free to contact me directly at my email address on the top right corner of the blog page OR you can place your order at my Online Store.

Have a blessed day! Until next time... 

Tuesday, October 27, 2020

Curvy Celebrations cards - 3 ways

 Hello Everyone!

I'm back to share with you some sneak peeks of the exclusive and early-release Quite Curvy Variety Bundle. The samples I'm about to show you will become available to customers beginning Tuesday, November 3rd. 


The Quite Curvy products are a part of the upcoming January-June 2021 Mini Catalog.

I decided to make 3 different projects using this bundle that I was able to get first dibs on, as part of the SU! demonstrator benefits.

Card 1 - Fall Birthday 

I just love the fall weather and couldn't wait to put a "slim-line" birthday card together. 

I was inspired by a fellow demonstrator, Yvonne Spikmans, and decided to CASE her card as shown below. It's a stunning card, don't you agree?

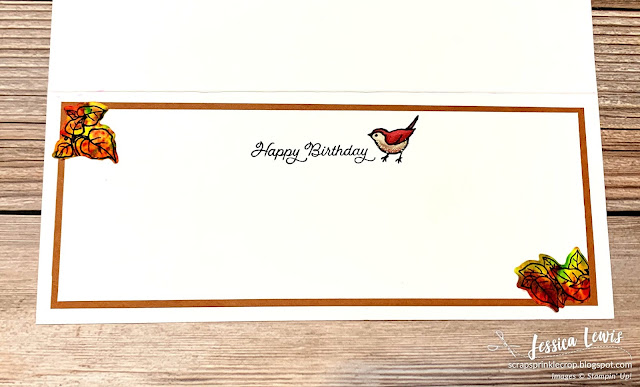
Below is my version of the card. Like I mentioned above, this is a "slim-line" card and used the retired pigment sprinkles to create the colorful fall leaves. The finished card measures 3.5" x 8.5".


Here are the steps that I took to make this card:

STEP 1: Use a piece of Watercolor Paper and generously mist it with water. Sprinkle red, orange, green and yellow pigment sprinkles randomly over watercolor paper. If you don't have pigment sprinkles, use a watercolor brush and some ink to watercolor the paper. I was too impatient to let it dry so I took a paper towel and set it over the watercolor paper and rubbed the paper towel with my hand to absorb the extra water (image on right). Set aside to completely dry. 


STEP 2: Cut a piece of Thick Whisper White Cardstock to 7" x 8.5" and score the 7" side at 3.5".

STEP 3: Cut a piece of Cinnamon Cider Cardstock to  3 1/16" x 8 1/16" and set aside.

STEP 4: Cut a piece Whisper White Cardstock to 2.5" x 8". Use the dotted curvy die to cut midway the cardstock piece (You'll have to run it through your machine twice since the cardstock is longer than the die). Then use the Wrapped in Texture embossing folder to emboss the two pieces (you'll have to run it through your machine twice since the cardstock is longer than the embossing folder). 

STEP 5: Use the embossed white cardstock pieces to mark where you want to stamp the sentiment. Use versamark and white embossing powder to heat emboss the sentiment. 

STEP 6:  Stamp the leaves onto the dry watercolor paper from Step 1 using Black Stazon Ink then cut out with die. 

STEP 7: Begin assembling your card by adhering the Cinnamon Cider piece to the center of your card front. Then adhere the white embossed cardstock pieces onto the Cinnamon Cider piece such that you have 1/16" of border around.

STEP 8: Trim the leaves such that you have different lengths as shown on the card sample. 

STEP 9: Stamp the three different bird images using Memento Ink onto a scrap piece of whisper white cardstock. Color the birds using the following Stampin' Blends: Cinnamon Cider, Cherry Cobbler, Mango Melody, Crumb Cake. Adhere birds using dimensionals onto card front.

STEP 10: Finish the front with a few Elegant Faceted Gems placed randomly over card front. Also use a little Wink of Stella on the breast of the birds for a slight touch of shimmer.

STEP 11: I like to finish my cards on the inside and used a couple of leftover pieces that I trimmed off for the leaves and placed it inside of the card. The "Happy Birthday" sentiment comes from the Posted For You stamp set.


Card 2 -  Hooray for You 
I took a similar approach for this next card. This one is more of an everyday card. I did color the leaves with my dark and light Granny Apple Green Stampin' Blends for some color depth.


SUPPLIES USED:
  • PAPER/CARDSTOCK: Granny Apple Green designer series paper (dsp), whisper white CS, real red CS
  • INKS: memento black, versamark
  • STAMPIN' BLENDS: Misty Moonlight combo, Granny Apple green combo, Mango Melody combo, Gray Granite combo
  • STAMPS: Quite Curvy (coming Nov. 3rd), Forever Fern (for the "You can do this" sentiment on inside of card)
  • DIES: Curvy (coming Nov. 3rd)
  • EMBOSSING FOLDER: Tasteful Textile
  • White embossing powder
  • EMBELLISHMENTS: Wink of Stella, Elegant Faceted gems

Card 3 -  Made with Love

This last card sample is not a slim-line card. I decided to go back to a traditional 4.25" x 5.5" card size.

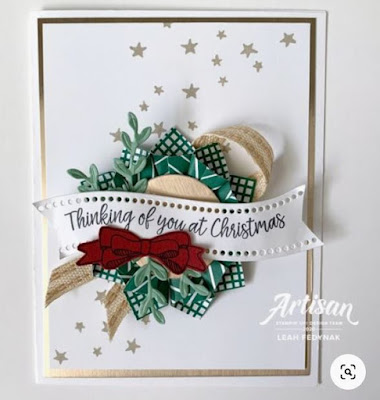
I CASED a beautiful card I found on Pinterest by Artisan Design Team Member, Leah Fedynak. I just love her card and all the elements she included in it! I can't help but CASE-ing cards that inspire me!!! 


Here's my version of the card. It's not a as gorgeous as Leah's version of the card but I still think it's cute in it's own way. You definitely wouldn't be able to fit this in a flat envelope, instead you could use a clear acetate box to deliver to that special someone.


The most labor intensive part was the little paper ornament. I put it together as Leah described on her blogpost.

SUPPLIES USED:
  • PAPER/CARDSTOCK: Classic Christmas designer series paper (coming Nov.3rd), whisper white CS, Cherry Cobbler CS, Shaded Spruce CS, Brushed Metallic CS
  • INKS: Shaded Spruce, Cherry Cobbler
  • STAMPS: Quite Curvy (coming Nov. 3rd)
  • DIES: Curvy (coming Nov. 3rd)
  • RIBBON: Gold Cord (from Wonder of the Season ribbon combo pack)


Be sure to check back on November 3rd at my Online Store for the new release of this Quite Curvy Variety Bundle! It's so much fun to play with and the designs are limitless!  

I do hope you've enjoyed these card samples that give you a peek at the Quite Curvy bundle! 

Until next time... 


Saturday, October 3, 2020

Blog Candy Giveway & World Cardmaking Day

 HAPPY WORLD CARDMAKING DAY!!!


If you didn't know already, today is the official day to celebrate cardmaking! 

These days, everyone needs a lift and wants to hear that they’re important to someone. And with everything going on in the world, cards are a perfect way to reach out and show appreciation for special friends and will be very welcome indeed.

See a list below of the following products for World Cardmaking Day inspiration,  along with some videos on how to celebrate this worldwide holiday.

 
 One card, three ways video: 


Making multiples in minutes video: 


One kit, three ways video: 


GIVEAWAY!

Comment in this post below and tell me about how you're celebrating World Cardmaking Day and you will be entered into a drawing to win this beautiful Press On stamp set from the 2020 Holiday Catalog.

I will select a random winner on Monday, October 5th and announce it that same day. Drawing closes on Sunday, October 4th 12pm (CST).
 

... And remember, once you finish creating your beautiful cards, let’s all be sure to send them off with a handwritten message to brighten someone’s day!


Wednesday, September 23, 2020

24-Hour Stamp Sale by Stampin' UP!

 Happy Hump Day!

I'm eager to share with you about the Stamp Sale that's happening today!


For 24 hours today, September 23rd — from 12:00 AM to 11:59 PM (MT) online, and 7:00 AM to 6:50 PM (MT) by phone—a select number of cling and photopolymer stamp sets from the 2020–2021 Annual Catalog will be available for purchase at a 15% discount.


You can place an order through me, or you can shop directly through
My Online store. The store will have a category entitled “Stamp Sale” that displays every stamp set on sale to ensure a quick and easy shopping experience.

I have put together a visual of all the stamp sets in the Sale for quick finds. Pair this with THE FLYER  to view item numbers and prices.


For anyone that places an order of $35 or more, you will receive a FREE Take your Pick Tool . This is a separate offering and not a part of Stampin' UP!'s 24-hour sale promotion. 
 
When you order online, be sure to use this HOST CODE at checkout:  3YMDFSPZ 

That is all for today! Until next time ...   

Tuesday, September 8, 2020

Giveaway Winner & Coming Home Card

 Welcome to today's Blog Post!

Let's get to the first item of business.... the WINNER of my last blog post for the Gilded Autumn Designer Series Paper, is 

Karen !!!! Congratulations!

Karen, please e-mail me (by clicking on "email me" button on right side of page) your mailing address so that I may send your prize to you. 


Along with today's blog post winner, allow me to share with you about the Trimming the Town Suite from page 24 of the 2020 Holiday Catalog.

There is something REALLY special about this Suite... It is part of the "Making A Difference" mission that Stampin' UP! has.
 
I absolutely LOVE the missions that Stampin' UP! has in order to make a difference around the world. I am so thankful that their heart is to help those that are devoted to adoption, foster care, and infertility!!! This is simply A.W.E.S.O.M.E.! 

According to the most recent federal data, there are currently more than 400,000 children in foster care in the United States alone. My heart aches when I hear this statistic and I encourage you to consider Making A Difference in this mission by purchasing the Suite OR the Bundle (stamp set + dies).

I purchased the Trimming the Town Suite Collection not only because it's an adorable collection of products, but because by purchasing the suite, Stampin' UP! will donate towards these charities. 

My project that I created using this suite doesn't necessarily pertain to Christmas. It's actually a card geared for my son's teachers, whom I want to feel appreciated for the extra difficulties they are having to endure this year due to COVID-19 regulations within the school.


Here's the front and inside view of a single card:


Here are a few tips to make the card:

  • In order to make the "school house", you will need to trim off the chimney from the largest house image.

  •  The car image in this stamp set faces to the right and so I wanted the reverse of that in order to have the car going towards the "school". In order to accomplish this, I stamped the car image onto my silicone craft sheet using Memento Black Ink then placed a piece of whisper white cardstock over it,rubbed it, to transfer the image.
  • I did a little Punch Art to make the sun image. I used two punches: the Medium Daisy and the 1" circle (retired). Simply follow the quick tutorial I created below:


  •  I used the label below from the Tasteful Labels Dies for the sentiment and trimmed it as shown.


Products Used:


This is all for today! Please feel free to ask me any questions!

Until next time...