Thursday, June 23, 2022

TGIFC373 - Easy card using paper clips

 Welcome to this week's post, crafty friends!

I'm glad that you're here as I present to you my entry into this week's TGIF Challenge #373


I chose to create a simple but striking card that uses paper clips as more of a aesthetic look rather than being functional. I believe the Rays of Light background stamp really helps the image pop.... don't you just LOVE this stamp?!


Cardmaking Instructions

  • Place the Rays of Light background stamp onto your Stamparatus and stamp the image onto a 4-1/8" x 5-3/8" piece of Basic White cardstock using Crushed Curry ink. Adhere it to your Basic Black cardstock card-base (A2).
  • Cut out a 1-3/4" circle from Basic White cardstock and place some black paper clips around the circle as shown below (never mind the white paper clips... I was trying out something different but didn't turn out).
  • 1-1/4" length paper clips

  • Heat emboss the sentiment, "Hello there", from the Nature's Prints stamp set onto some Basic Black cardstock using white embossing powder. Cut out the sentiment piece using the 3rd from smallest circle using the Stylish Shapes dies. Adhere this piece onto the center of the paper clips using glue dots.
  • Adhere the finished paper clip piece to the center of the white open space of the background piece using glue dots.
  • To finish off the card-front, adhere some Matte Black Dot embellishments ,placed randomly.

  • I carried over a similar look on the inside of the card by using my Sponge Dauber to sponge some Crushed Curry ink onto the center of the background image and stamped it towards the right side of a Basic White piece of cardstock. This piece was matted with a 4-1/8" x 5-3/8" piece of Crushed Curry cardstock then adhered to the Basic black card-base.
  • Stamp the sentiment over the center of the white space as you see below.


Cardmaking Supplies


Thank you SO VERY MUCH for taking a look at my project today and feel free to comment below! I'd LOVE to hear from you!

Until next time ... 


Monday, June 6, 2022

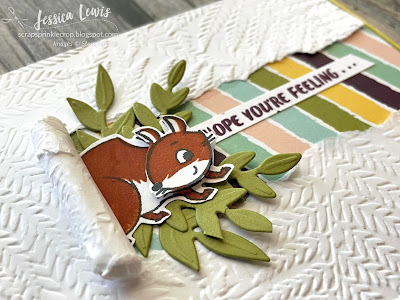
Torn Paper Technique with Nuts About Squirrels

Hello Crafty friends! 

I was long overdue for trying out the "torn paper technique" that I had seen buzzing around social media and couldn't wait to give it a try. 

Fellow Stampin' Up! demonstrator, Alisa Tilsner's card is what encouraged me to finally go for it! Click here to view her version of the technique.

Unfortunately, this particular card does involve some fussy cutting since there are no dies with the Nuts About Squirrels stamp set. It showcases the HOST DSP - Design A Daydream along with the new Fern 3D embossing folder.


 Cardmaking Tips:

  • Mat the Daffodil Delight card base with a 5-3/8" x 4-1/8" piece of Old Olive cardstock.
  • The white cardstock piece (5-1/4" x 4") was embossed with the Fern 3D embossing folder first. Lightly mark the right side of the white piece with your pencil about 1-1/4" from the top and bottom so you can see where the tear would begin. After removing about 1-1/2" off the torn strip, roll it up tight and adhere it about 1-1/2" from the left edge of the cardstock.
  • Adhere a Design A daydream DSP piece that measures 2" x 5" behind the white cardstock piece.
  • Cut out a few leaves from the Forever Flourishing dies from Old Olive cardstock. Adhere adjacent to the rolled up piece of white cardstock.
  • Stamp the outlined squirrel image onto a piece of Basic White cardstock with Memento Black ink and layer the solid squirrel image with Cajun Craze ink. Fussy cut the body of the squirrel without it's tail. Insert the squirrel behind the rolled strip of white cardstock.
  • You can skip this step, but I did choose to pop up the squirrel's face by stamping and fussy-cutting out another face and layered it with a dimensional directly above.
  • The sentiment was stamped in Blackberry Bliss ink onto a piece of Basic White cardstock and trimmed such that the bottom part is clipped off. Leave some room after the sentiment to add three dots with your Blackberry Bliss stampin' Write marker.
  • Carry a few of the elements from the card front to the inside of the card as you see below. The two acorns were stamped onto white cardstock using Crumb Cake and Soft Suede ink the fussy cut.


Cardmaking Supplies:


Thank you so much for stopping  by and hope you get the chance to try the "Torn Paper Technique" soon! 

Please feel free to comment on your thoughts about this technique. Would you try it?

Until next time ...